Lab 3 - Unit Testing🔗
Lab 3.1 Set up GitHub Repository
Lab 3.2 Python Classes Review
Lab 3.3 Create a Python Unit Test
3.1 Set up GitHub Repository🔗
Objectives🔗
Part 1 - Join the GitHub Classroom
Part 2 - Initialize the Local Repository
Part 3 - Set up the Remote Repository
Instructions🔗
Part 1: Join the GitHub Classroom🔗
-
Follow the GitHub assignment link posted in Canvas. If you did not complete the setup in Lab 2.2 you will need to authorize GitHub Classroom to link with your account and select your name from the list of students.
-
Accept the assignment and refresh the page until it says your repository has been created. Click the link to proceed to the repository.
Important
GitHub Classroom is currently experiencing a bug where you might receive a Repository Access Issue error after accepting the assignment. If this happens, check the e-mail connected to your GitHub account for an invitation e-mail from GitHub. Use the View Invitation link in the e-mail to see the link to accept the invitation and proceed to the repository.
-
Select the Code dropdown and copy the HTTPS URL. Store it somewhere for use in a later step.
Tip
If you’ve configured your VM to use SSH to connect to GitHub instead of HTTPS, click on the Code dropdown, select the SSH tab, and copy the URL from there instead.
Part 2: Initialize the Local Repository🔗
You will be creating a local repository from a folder on the DEVASC VM. This folder already contains some files, so you will need to initialize a repository in the folder, pull down the files from the remote GitHub Classroom repository, then add the local files to the local repository to combine the remote and local files into a single repository.
Important
If you did not complete Lab 2, or you have reset your VM since then, you'll need to update Git to the newest version as well as configure your name, e-mail address, and default branch name, before beginning this lab.
Open Lab 2 and complete steps 1, 2, and the first 3 tasks of step 3 of the Initializing Git instructions before continuing.
-
Inside the DEVASC VM, open a terminal and change to the
~/labs/devnet-src/unittestdirectory.devasc@labvm:~$ cd labs/devnet-src/unittest/ devasc@labvm:~/labs/devnet-src/unittest$ -
View the listing of all files currently in the
unittestdirectory.devasc@labvm:~/labs/devnet-src/unittest$ ls -la total 24 drwxr-xr-x 2 devasc devasc 4096 Jun 1 2020 . drwxr-xr-x 14 devasc devasc 4096 Jan 23 15:05 .. -rw-r--r-- 1 devasc devasc 36 Apr 23 2020 recursive_json_search.py -rw-r--r-- 1 devasc devasc 4735 Apr 23 2020 test_data.py -rw-r--r-- 1 devasc devasc 36 Apr 23 2020 test_json_search.py -
Initialize this directory as a Git repository (don’t miss the . at the end of the command!).
devasc@labvm:~/labs/devnet-src/unittest$ git init .
Initialized empty Git repository in /home/devasc/labs/devnet-src/unittest/.git/
Part 3: Set up the Remote Repository🔗
-
Since we initialized our own local repository, rather than cloning an existing remote repository, we need to tell Git the location of the remote repository to synchronize with. Configure the location of the remote repository using the
git remote addcommand. Use the URL to the GitHub Classroom repository you copied at the end of Part 1, not the one in the command below.Tip
If you’ve configured your VM to use SSH to connect to GitHub, use the SSH URL that you copied in step 1, rather than the HTTPS link.
devasc@labvm:~/labs/devnet-src/unittest$ git remote add origin https://github.com/Ontario-Tech-NITS/lab-3-unit-testing-<username>.gitImportant
Make sure you use your GitHub URL that you copied in Part 1, not the one in the command example! Also, if you're using SSH, your URL will start with
git@github.comrather thanhttps://. -
Verify that the remote is properly configured with the
git remote --verbosecommand.devasc@labvm:~/labs/devnet-src/unittest$ git remote --verbose origin https://github.com/Ontario-Tech-NITS/lab-3-unit-testing-<username>.git (fetch) origin https://github.com/Ontario-Tech-NITS/lab-3-unit-testing-<username>.git (push) -
Pull down the files from the remote repository into the local repository. Remember to use your Personal Access Token as the password.
Tip
If you’ve configured your VM to use SSH to connect to GitHub instead of HTTPS, you will not be asked for a username and password, although you may be asked for a passphrase for your SSH key, if you configured one.
devasc@labvm:~/labs/devnet-src/unittest$ git pull origin main Username for 'https://github.com': username Password for 'https://username@github.com': Personal Access Token remote: Enumerating objects: 17, done. remote: Counting objects: 100% (17/17), done. remote: Compressing objects: 100% (14/14), done. remote: Total 17 (delta 1), reused 2 (delta 0), pack-reused 0 (from 0) Unpacking objects: 100% (17/17), 6.24 KiB | 3.12 MiB/s, done From https://github.com/Ontario-Tech-NITS/lab-3-unit-testing-<username> * branch main -> FETCH_HEAD * [new branch] main -> origin/main -
Use
git statusto verify all the local files are currently untracked.devasc@labvm:~/labs/devnet-src/unittest$ git status On branch main Untracked files: (use "git add <file>..." to include in what will be committed) recursive_json_search.py test_data.py test_json_search.py nothing added to commit but untracked files present (use "git add" to track) -
Add the files from the local working folder to the staging area (don’t miss the . at the end of the command!).
devasc@labvm: :~/labs/devnet-src/unittest$ git add . -
Commit these new files to the local repository. Use the commit message Initializing the repository.
devasc@labvm: :~/labs/devnet-src/unittest$ git commit -m "Initializing the repository" [main 6831c4d] Initializing the repository 3 files changed, 118 insertions(+) create mode 100644 recursive_json_search.py create mode 100644 test_data.py create mode 100644 test_json_search.py -
Use
git statusagain to verify that all files have been committed to the local repository and that you are working on a clean tree.devasc@labvm: :~/labs/devnet-src/unittest$ git status On branch main nothing to commit, working tree clean -
Push the local repository to the remote repository on GitHub, adding the files from the DEVASC VM to the existing README.md file already in the repository. Remember to use your Personal Access Token when prompted for your password.
Tip
If you’ve configured your VM to use SSH to connect to GitHub instead of HTTPS, you will not be asked for a username and password, although you may be asked for a passphrase for your SSH key, if you configured one.
devasc@labvm: :~/labs/devnet-src/unittest$ git push origin main Username for 'https://github.com': <username> Password for 'https://username@github.com': <Personal Access Token> Enumerating objects: 5, done. Counting objects: 100% (5/5), done. Delta compression using up to 2 threads Compressing objects: 100% (3/3), done. Writing objects: 100% (4/4), 2.03 KiB | 2.03 MiB/s, done. Total 4 (delta 0), reused 0 (delta 0) To https://github.com/Ontario-Tech-NITS/lab-3-unit-testing-<username>.git d20f486..6831c4d main -> main -
Using a web browser, open the remote repository on GitHub and verify that you see the newly tracked files. Your local and remote repositories are now synchronized, and you are ready to complete the rest of the lab, committing your changes as you go (when instructed).
3.2 Python Classes Review🔗
Objectives🔗
Part 1: Review Functions, Methods, and Classes
Part 2: Define a Function
Part 3: Define a Class with Methods
Background🔗
This part of the lab should be mostly review from the Object-Oriented Programming course you completed in 1st year. However, many of the concepts covered in this part of the lab will be important for the unit testing part which comes afterwards. Please read each step carefully and ensure you understand the concepts before moving on.
Instructions🔗
Part 1: Review Functions, Methods, and Classes🔗
In this part, you review the difference between functions and methods. You also review the basic structure of a class.
What is a function?🔗
As a quick review, recall that a function is an independently defined block of code that is called by name. In the following example, the function called functionName is defined and then called. Notice that it is an independent block of code. It is not encapsulated in any other code.
# Define the function
def functionName:
    ...blocks of code...

# Call the function
functionName()
What is a method?🔗
A method, however, cannot be called by itself. It is dependent on the object in which it is defined. In the following example, the class className is declared and three methods are defined. The class is instantiated and then each method of the class is called.
Note
This pseudo-code does not explicitly show the class constructor __init__ method with the self variable. This special method is reviewed below.
# Define the class
class className

    # Define a method
    def method1Name
        ...blocks of code

    # Define another method
    def method2Name
        ...blocks of code

    # Define yet another method
    def method3Name
        ...blocks of code

# Instantiate the class
myClass = className()

# Call the instantiation and associated methods
myClass.method1Name()
myClass.method2Name()
myClass.method3Name()
Part 2: Define a Function🔗
In this part, you will define a function with arguments and then call the function.
-
Open a new text file and save it as myCity.py in your ~/labs/devnet-src/unittest directory. You can use vi/vim/nano/pluma or any other available text editor, although using VS Code will help you ensure your code is indented properly (
code myCity.pyto use VSCode). -
Define the function
myCitywith the argumentcityfor city name. When the function is called with a specified city name, it prints a statement that includes the city name.Pythondef myCity(city): print(f"I live in {city}.") -
In the myCity.py file, call the function
myCitypassing it different values forcity, as shown in the following examples. You can use any city names as long as you have 3.PythonmyCity("Austin") myCity("Tokyo") myCity("Salzburg") -
Save and run the myCity.py file. You should get the following output.
devasc@labvm:~/labs/devnet-src/unittest$ python3 myCity.py I live in Austin. I live in Tokyo. I live in Salzburg. devasc@labvm:~/labs/devnet-src/unittest$ -
Add the myCity.py file to the staging area then commit the changes to the local repository using the message Creating a new function.
devasc@labvm:~/labs/devnet-src/unittest$ git add myCity.py
devasc@labvm:~/labs/devnet-src/unittest$ git commit -m "Creating a new function"
[main 6c87d98] Creating a new function
1 file changed, 6 insertions(+)
create mode 100644 myCity.py
devasc@labvm:~/labs/devnet-src/unittest$
Part 3: Define a Class with Methods🔗
In this part, you will define a class, use the __init__() function to define a method for the class, and then create instances of the class.
Step 1: Define and then instantiate a class with the __init__() method🔗
A Python class is used to create objects that have properties and methods. All Python classes typically include an explicitly defined __init__() function, although you can create a class without defining one. The __init__() function is always initiated when a class is instantiated. Instantiating a class creates a copy of the class which inherits all the class variables and methods.
Note
Although it is sometimes called the __init__() function, it is dependent on the class. Therefore, it is technically a method.
-
Open a new text file and save it as myLocation.py.
-
Define a class with the name
Locationand press Enter. If you are working in VS Code, then the text editor should automatically indent four spaces.Pythonclass Location: |<-- cursor should now be here -
Next, define the
__init__()function. By convention, the first parameter is calledself. Theselfparameter is a reference to the current instance of the class itself and is used to access variables that belong to the entire class. The__init__()function is then assigned any variables the entire class needs. In the following example, define anameandcountryvariable. Press Enter twice and then backspace twice to the left margin.Pythondef __init__(self, name, country): self.name = name self.country = country |<-- cursor should now be here -
You can test that this class is now ready to use. Instantiate the class by assigning it a name of your choice. Then specify the values for the required class variables
nameandcountry. The following example uses theLocationclass to instantiate a class calledlocwith anameandcountryspecified by you.Important
Use your name and country.
Pythonloc = Location("Josh", "Canada") -
To verify that the instantiated
locclass now has your assigned name and country, add print statements to your script.Pythonprint(loc.name) print(loc.country) -
To verify the
locis an instance of the Location class, add the following print statement that will print the data type forloc.Pythonprint(type(loc)) -
Save and run your script. You should get the following output, except with your supplied name and country. Notice the last line confirms that
locis indeed an instance of the Location class.devasc@labvm:~/labs/devnet-src/unittest$ python3 myLocation.py Your_Name Your_Country <class '__main__.Location'> devasc@labvm:~/labs/devnet-src/unittest$ -
Add the myLocation.py file to the staging area then commit the changes to the local repository using the message Defining and testing a new class. This is especially important since you will be deleting some of the code in this file in the next step, and the commit history will allow you to see what changed between versions of this file.
devasc@labvm:~/labs/devnet-src/unittest$ git add myLocation.py
devasc@labvm:~/labs/devnet-src/unittest$ git commit -m "Defining and testing a new class"
[main e0cf86e] Degining and testing a new class
1 file changed, 9 insertions(+)
create mode 100644 myLocation.py
devasc@labvm:~/labs/devnet-src/unittest$
Step 2: Add a method to the Location class🔗
Now add a method to the Location class that can be called by a programmer when the class is instantiated. In this simple example, create a method to print the statement, My name is name and I live in country.
-
Delete the code that begins with the instantiation of the
locclass, to the end of theprintstatements. Your myLocation.py script should now only include the following code.Pythonclass Location: def __init__(self, name, country): self.name = name self.country = country -
With your cursor at the end of the line
self.country = country, press the Enter key twice and Backspace once.Pythonself.country = country | <--Your cursor should be here -
Define a new method called
myLocationand assign it theselfparameter so that the new method can access the variables defined in the__init__()function. Then, define aprintstatement to print out the string specified above.Pythondef myLocation(self): print(f"Hi, my name is {self.name} and I live in {self.country}.") -
Press the Enter key twice and Backspace twice.
-
Save and run your script to make sure there are no errors. You will not get any output yet.
Step 3: Instantiate the Location class multiple times and call the myLocation method🔗
Now that you have a class, you can instantiate it as many times as you like providing different values for the class variables each time.
-
Add the following code to your myLocation.py script to instantiate
Locationclass and call the method. You do not need to add the comments.Python# First instantiation of the class Location loc1 = Location("Tomas", "Portugal") # Call a method from the instantiated class loc1.myLocation() -
Save and run your script. You should get the following output.
devasc@labvm:~/labs/devnet-src/unittest$ python3 myLocation.py Hi, my name is Tomas and I live in Portugal. devasc@labvm:~/labs/devnet-src/unittest$ -
Add two more instantiations and then a final one where you specify the name and values for
your_loc. Use your own first name for theyour_locvalue at the end.Pythonloc2 = Location("Ying", "China") loc3 = Location("Amare", "Kenya") loc2.myLocation() loc3.myLocation() your_loc = Location("Josh", "Canada") your_loc.myLocation() -
Save and run your script. You should get the following output (with your name in place of "Josh").
devasc@labvm:~/labs/devnet-src/unittest$ python3 myLocation.py Hi, my name is Tomas and I live in Portugal. Hi, my name is Ying and I live in China. Hi, my name is Amare and I live in Kenya. Hi, my name is Josh and I live in Canada. devasc@labvm:~/labs/devnet-src/unittest$ -
Add the updated myLocation.py file to the staging area then commit the changes to the local repository using the message Updated Location class to use methods.
devasc@labvm:~/labs/devnet-src/unittest$ git add myLocation.py
devasc@labvm:~/labs/devnet-src/unittest$ git commit -m "Updated Location class to use methods"
[main 737696c] Updated Location class to use methods
1 file changed, 11 insertions(+), 4 deletions(-)
devasc@labvm:~/labs/devnet-src/unittest$
3.3 Create a Python Unit Test🔗
Objectives🔗
Part 1: Explore Options in the unittest Framework
Part 2: Test a Python Function with unittest
Background / Scenario🔗
Unit tests examine independent units of code, like functions, classes, modules, and libraries. There are many reasons for writing a script using Python’s unittest library. One obvious reason is that if you find an issue in isolated code by deliberate testing, you know that the problem is in the function or other unit under test. The problem is not in the larger application that may call this function. You will also know exactly what triggered the error because you wrote the unit test that exposed the issue. Bugs found this way are usually quick and easy to fix, and fixes made at this detailed level are less likely to cause unanticipated side effects later on in other code that relies on the tested code.
You can run unit tests manually if the code is small, but typically unit tests should be automated. When writing a unit test, think about the following:
-
The unit test should be simple and easy to implement.
-
The unit test should be well documented, so it's easy to figure out how to run the test, even after several years.
-
Consider the test methods and inputs from every angle.
-
Test results should be consistent. This is important for test automation.
-
Test code should work independently of code being tested. If you write tests that need to change program state, capture state before changing it, and change it back after the test runs.
-
When a test fails, results should be easy to read and clearly point out what is expected and where the issues are.
In this lab, you will explore the unittest framework and use unittest to test a function.
Instructions🔗
Part 1: Explore Options in the unittest Framework🔗
Step 1: Answer the following questions in the unittest_questions.txt file in the unittest folder🔗
Python provides a Unit Testing Framework (called unittest) as part of the Python standard library. If you are not familiar with this framework, study the "Python unittest Framework" to familiarize yourself. You will need that knowledge or documentation to answer questions in this part of the lab.
Answer the following questions using the unittest_questions.txt file that you will find in your unittest repository on the DEVASC VM (it was pulled down from the GitHub repository you pulled in Lab 3.1). You can use terminal editors like vi or nano to answer the questions or open them in the Ubuntu graphical interface with an editor like Pluma. Save the file when you are done so it can be uploaded to GitHub.
Question 1
What unittest class do you use to create an individual unit of testing?
Answer in the unittest_questions.txt file.
A test runner is responsible for executing tests and providing you with results. A test runner can be a graphical interface but, in this lab, you will use the command line to run tests.
Question 2
How does the test runner know which methods are a test?
Answer in the unittest_questions.txt file.
Question 3
What command will list all of the command line options for unittest as shown in the following output?
devasc@labvm:~/labs/devnet-src$ <command>
<output omitted>
optional arguments:
  -h, --help           show this help message and exit
  -v, --verbose        Verbose output
  -q, --quiet          Quiet output
  --locals             Show local variables in tracebacks
  -f, --failfast       Stop on first fail or error
  -c, --catch          Catch Ctrl-C and display results so far
  -b, --buffer         Buffer stdout and stderr during tests
  -k TESTNAMEPATTERNS  Only run tests which match the given substring

Examples:
  python3 -m unittest test_module               - run tests from test_module
  python3 -m unittest module.TestClass          - run tests from module.TestClass
  python3 -m unittest module.Class.test_method  - run specified test method
  python3 -m unittest path/to/test_file.py      - run tests from test_file.py
<output omitted>
For test discovery all test modules must be importable from the top level
directory of the project.
devasc@labvm:~/labs/devnet-src$
Answer in the unittest_questions.txt file.
Step 2: Commit your answer file to Git🔗
Add the updated unittest_questions.txt file to the staging area then commit the changes to the local repository using the message Answered the unittest questions.
devasc@labvm:~/labs/devnet-src/unittest$ git add unittest_questions.txt
devasc@labvm:~/labs/devnet-src/unittest$ git commit -m "Answered the unittest questions"
[main cdce4a3] Answered the unittest questions
 1 file changed, 3 insertions(+), 3 deletions(-)
devasc@labvm:~/labs/devnet-src/unittest$
Part 2: Test a Python Function with unittest🔗
In this part, you will use unittest to test a function that performs a recursive search of a JSON object. The function returns values tagged with a given key. Programmers often need to perform this kind of operation on JSON objects returned by API calls.
This test will use three files as summarized in the following table:
| File | Description |
|---|---|
| recursive_json_search.py | This script will include the json_search() function we want to test. |
| test_data.py | This is the data the json_search() function is searching. |
| test_json_search.py | This is the file you will create to test the json_search() function in the recursive_json_search.py script. |
Step 1: Review the test_data.py file🔗
Open the ~/labs/devnet-src/unittest/test_data.py file and examine its contents. This JSON data is typical of data returned by a call to Cisco’s DNA Center API. The sample data is sufficiently complex to be a good test. For example, it has dict and list types interleaved.
devasc@labvm:~/labs/devnet-src/unittest$ more test_data.py
key1 = "issueSummary"
key2 = "XY&^$#*@!1234%^&"

data = {
  "id": "AWcvsjx864kVeDHDi2gB",
  "instanceId": "E-NETWORK-EVENT-AWcvsjx864kVeDHDi2gB-1542693469197",
  "category": "Warn",
  "status": "NEW",
  "timestamp": 1542693469197,
  "severity": "P1",
  "domain": "Availability",
  "source": "DNAC",
  "priority": "P1",
  "type": "Network",
  "title": "Device unreachable",
  "description": "This network device leaf2.abc.inc is unreachable from controller. The device role is ACCESS.",
  "actualServiceId": "10.10.20.82",
  "assignedTo": "",
  "enrichmentInfo": {
    "issueDetails": {
      "issue": [
        {
--More--(12%)
Step 2: Create the json_search() function that you will be testing🔗
Our function should expect a key and a JSON object as input parameters and return a list of matched key/value pairs. Here is the current version of the function that needs to be tested to see if it is working as intended.
The purpose of this function is to import the test data first. Then it searches for data that matches the key variables in the test_data.py file. If it finds a match, it will append the matched data to a list. The print() function at the end prints the contents for the list for the first variable key1 = "issueSummary".
from test_data import *
def json_search(key,input_object):
    ret_val=[]
    if isinstance(input_object, dict): # Iterate dictionary
        for k, v in input_object.items(): # searching key in the dict
            if k == key:
                temp={k:v}
                ret_val.append(temp)
            if isinstance(v, dict): # the value is another dict so repeat
                json_search(key,v)
            elif isinstance(v, list): # it's a list
                for item in v:
                    if not isinstance(item, (str,int)): # if dict or list repeat
                        json_search(key,item)
    else: # Iterate a list because some APIs return JSON object in a list
        for val in input_object:
            if not isinstance(val, (str,int)):
                json_search(key,val)
    return ret_val

print(json_search("issueSummary",data))
-
Open the ~/labs/devnet-src/unittest/recursive_json_search.py file (using
codeopens the file in Visual Studio Code)devasc@labvm:~/labs/devnet-src/unittest$ code recursive_json_search.py -
Copy the code above into the file and save it.
-
Run the code. You should get no errors and output of
[ ]indicating an empty list. If thejson_search()function was coded correctly (which it is not), this would tell you that there is no data with the "issueSummary" key reported by JSON data returned by the Cisco DNA Center API. In other words, there are no issues to report.devasc@labvm:~/labs/devnet-src/unittest$ python3 recursive_json_search.py [] devasc@labvm:~/labs/devnet-src/unittest$ -
But how do you know that the
json_search()function is working as intended? You could open the test_data.py file and search for the key issueSummary, as shown below. If you did, you would indeed find that there is an issue (signified by the appearance of issueSummary in the file). This is a small data set and a relatively simple recursive search. However, production data and code are rarely this simple. Therefore, testing code is vital to quickly finding and fixing errors in your code.JSON"issue": [ { "issueId": "AWcvsjx864kVeDHDi2gB", "issueSource": "Cisco DNA", "issueCategory": "Availability", "issueName": "snmp_device_down", "issueDescription": "This network device leaf2.abc.inc is unreachable from controller. The device role is ACCESS.", "issueEntity": "network_device", "issueEntityValue": "10.10.20.82", "issueSeverity": "HIGH", "issuePriority": "", "issueSummary": "Network Device 10.10.20.82 Is Unreachable From Controller", "issueTimestamp": 1542693469197, "suggestedActions": [ {
Step 3: Create some unit tests that will test if the function is working as intended🔗
-
Open the ~labs/devnet-src/unittest/test_json_search.py file.
devasc@labvm:~/labs/devnet-src/unittest$ code test_json_search.py -
In the first line of the script after the comment, import the
unittestlibrary.Pythonimport unittest -
Add lines to import the function you are testing as well as the JSON test data the function uses.
Pythonfrom recursive_json_search import * from test_data import * -
Now add the following
json_search_testclass code to the test_json_search.py file. The code creates the subclassTestCaseof theunittestframework. The class defines some test methods to be used on thejson_search()function in the recursive_json_search.py script.Notice that each test method begins with
test_, enabling theunittestframework to discover them automatically. Add the following lines to the bottom of your ~/labs/devnet-src/unittest/test_json_search.py file (you should type this out by hand to help you better understand what each test does):Pythonclass json_search_test(unittest.TestCase): '''test module to test search function in `recursive_json_search.py`''' def test_search_found(self): '''key should be found, return list should not be empty''' self.assertTrue([]!=json_search(key1,data)) def test_search_not_found(self): '''key should not be found, should return an empty list''' self.assertTrue([]==json_search(key2,data)) def test_is_a_list(self): '''Should return a list''' self.assertIsInstance(json_search(key1,data),list)In the unittest code, you are using three methods to test the search function:
- Given an existing key in the JSON object, see if the testing code can find such a key (
test_search_found). - Given a non-existent key in the JSON object, see if the testing code confirms that no key can be found (
test_search_not_found). - Check if our function returns a list, as it should always do (
test_is_a_list).
To create these tests, the script uses some of the built-in assert methods in the unittest
TestCaseclass to check for conditions. TheassertTrue(x)method checks if a condition is true andassertIsInstance(a, b)checks ifais an instance of thebdata type. The type used here islist.Also, notice that the comments for each method are specified with the triple single quote (
'''). This is required if you want the test to output a description of the test method when it runs. Using the single hash symbol (#) for the comment would not print out the description of a failed test.Note
In case you missed it, key1 and key2 are defined at the beginning of the test_data.py module, which you imported into the test_json_search.py file that you just created. The values are:
Pythonkey1 = "issueSummary" key2 = "XY&^$#*@!1234%^&"The string issueSummary exists in the test data, and the string XY&^$#*@!1234%^& does not.
- Given an existing key in the JSON object, see if the testing code can find such a key (
-
For the last part of the script, add the
unittest.main()method. This enables running unittest from the command line. The purpose ofif __name__ == ‘__main__’is to make sure that theunittest.main()method runs only if the script is run directly. If the script is imported into another program,unittest.main()will not run. For example, you might use a different test runner than unittest to run this test.Pythonif __name__ == '__main__': unittest.main()Important
Make sure that this code is not indented. It should be aligned with the left margin.
Step 4: Run the test to see the initial results🔗
-
Run the test script in its current state to see what results it currently returns. First, you see the empty list. Second, you see the
.F.highlighted in the output. A period (.) means a test passed and anFmeans a test failed. Therefore, the first test passed, the second test failed, and the third test passed.devasc@labvm:~/labs/devnet-src/unittest$ python3 test_json_search.py [] .F. ====================================================================== FAIL: test_search_found (__main__.json_search_test) key should be found, return list should not be empty ---------------------------------------------------------------------- Traceback (most recent call last): File "test_json_search.py", line 10, in test_search_found self.assertTrue([]!=json_search(key1,data)) AssertionError: False is not true ---------------------------------------------------------------------- Ran 3 tests in 0.000s FAILED (failures=1) devasc@labvm:~/labs/devnet-src/unittest$ -
To list each test and its results, run the script again under unittest with the verbose (
-v) option. Notice that you do not need the .py extension for the test_json_search.py script since it’s being provided as an argument to theunittestmodule. You can see that your test methodtest_search_found()is failing.Note
Python does not necessarily run your tests in order. Tests are run in alphabetical order based on the test method names.
devasc@labvm:~/labs/devnet-src/unittest$ python3 -m unittest -v test_json_search
[]
test_is_a_list (test_json_search.json_search_test)
Should return a list ... ok
test_search_found (test_json_search.json_search_test)
key should be found, return list should not be empty ... FAIL
test_search_not_found (test_json_search.json_search_test)
key should not be found, should return an empty list ... ok

======================================================================
FAIL: test_search_found (test_json_search.json_search_test)
key should be found, return list should not be empty
----------------------------------------------------------------------
Traceback (most recent call last):
File "/home/devasc/labs/devnet-src/unittest/test_json_search.py", line 10, in test_search_found
    self.assertTrue([]!=json_search(key1,data))
AssertionError: False is not true

----------------------------------------------------------------------
Ran 3 tests in 0.000s

FAILED (failures=1)
devasc@labvm:~/labs/devnet-src/unittest$
Step 5: Investigate and correct the first error in the recursive_json_search.py script🔗
The assertion, key should be found, return list should not be empty ... FAIL, indicates the key was not found. Why? If we look at the text of our recursive function, we see that the statement ret_val=[ ] is being repeatedly executed, each time the function is called. This causes the function to empty the list each time it is called and lose accumulated results from the ret_val.append(temp) statement, which is adding to the list created by ret_val=[ ].
def json_search(key,input_object):
    ret_val=[]
    if isinstance(input_object, dict):
        for k, v in input_object.items():
            if k == key:
                temp={k:v}
                ret_val.append(temp)
-
Move the
ret_val=[ ]out of our function in recursive_json_search.py (put it right before the function definition) so that the iteration does not overwrite the accumulated list each time.Pythonret_val=[] def json_search(key,input_object): -
Save and run the script. You should get the following output which verifies that you resolved the issue. The list is no longer empty after the script runs.
devasc@labvm:~/labs/devnet-src/unittest$ python3 recursive_json_search.py
[{'issueSummary': 'Network Device 10.10.20.82 Is Unreachable From Controller'}]
devasc@labvm:~/labs/devnet-src/unittest$
Step 6: Run the test again to see if all errors in the script are now fixed🔗
-
You got some output last time you ran recursive_json_search.py, but can you be sure you resolved all the errors in the script? Run
unittestagain without the-voption to see iftest_json_searchreturns any errors. Typically, you do not use the-voption in order to minimize console output and make tests run faster. At the start of the log you can see..F, meaning that the third test failed this time.devasc@labvm:~/labs/devnet-src/unittest$ python3 -m unittest test_json_search.py [{'issueSummary': 'Network Device 10.10.20.82 Is Unreachable From Controller'}] ..F ====================================================================== FAIL: test_search_not_found (test_json_search.json_search_test) key should not be found, should return an empty list ---------------------------------------------------------------------- Traceback (most recent call last): File "/home/devasc/labs/devnet-src/unittest/test_json_search.py", line 13, in test_search_not_found self.assertTrue([]==json_search(key2,data)) AssertionError: False is not true ---------------------------------------------------------------------- Ran 3 tests in 0.000s FAILED (failures=1) devasc@labvm:~/labs/devnet-src/unittest$ -
Open the test_data.py file and search for
issueSummary, which is the value for key1. You should find it twice, but only once in the JSONdataobject (the other instance is the one at the very top of the file listing the values of the keys).But if you search for the value of key2, which is
XY&^$#*@!1234%^&, you will only find it at the top where it is defined because it is not in thedataJSON object. The third test comment stateskey should not be found, should return an empty list. This test is checking to make sure the value is not found in thedataJSON object, however, the function is returning a non-empty list. The issue is that theret_vallist is not being cleared after running the first two tests, causing the third test to fail.
Step 7: Investigate and correct the second error in the recursive_json_search.py script🔗
-
Review the recursive_json_search.py code again. Notice that the
ret_valis now a global variable after you fixed it in the previous step. This means that its value is preserved across multiple invocations of thejson_search()function. This is a good example of why it's bad practice to use global variables within functions. -
To resolve this issue, wrap the
json_search()function with an outer function. Delete your existingjson_search()function and replace with the refactored one below: (It won't hurt to call the function twice but it's not best practice to repeat a function.)Pythonfrom test_data import * def json_search(key,input_object): """ Search a key from JSON object, get nothing back if key is not found key : "keyword" to be searched, case sensitive input_object : JSON object to be parsed, test_data.py in this case inner_function() is actually doing the recursive search return a list of key:value pair """ ret_val=[] def inner_function(key,input_object): if isinstance(input_object, dict): # Iterate dictionary for k, v in input_object.items(): # searching key in the dict if k == key: temp={k:v} ret_val.append(temp) if isinstance(v, dict): # the value is another dict so repeat inner_function(key,v) elif isinstance(v, list): for item in v: if not isinstance(item, (str,int)): # if dict/list repeat inner_function(key,item) else: # Iterate a list because some APIs return JSON object in a list for val in input_object: if not isinstance(val, (str,int)): inner_function(key,val) inner_function(key,input_object) return ret_val print(json_search("issueSummary",data)) -
Save the file and run
unitteston the directory. Notice that you don't need to include the name of the file. This is because the unittest Test Discovery feature will run any local file it finds whose name begins withtest. You should get the following output. Notice that all tests now pass and the list for the issueSummary key is populated.devasc@labvm:~/labs/devnet-src/unittest$ python3 -m unittest [{'issueSummary': 'Network Device 10.10.20.82 Is Unreachable From Controller'}] ... ---------------------------------------------------------------------- Ran 3 tests in 0.001s OK devasc@labvm:~/labs/devnet-src/unittest$
Step 8: Stage and commit your changes, then push to GitHub🔗
-
Notice that, since you imported your custom modules into your files, Python created the
__pycache__directory in your working folder. It does not do this with modules that are part of the standard Python library, like thejsonandyamlmodules used in Lab 2.devasc@labvm:~/labs/devnet-src/unittest$ ls -la total 52 drwxr-xr-x 5 devasc devasc 4096 Feb 1 21:40 . drwxr-xr-x 14 devasc devasc 4096 Jun 1 2020 .. drwxrwxr-x 7 devasc devasc 4096 Feb 1 21:34 .git drwxrwxr-x 3 devasc devasc 4096 Feb 1 20:48 .github -rw-rw-r-- 1 devasc devasc 108 Feb 1 20:54 myCity.py -rw-rw-r-- 1 devasc devasc 443 Feb 1 21:22 myLocation.py drwxrwxr-x 2 devasc devasc 4096 Feb 1 22:12 __pycache__ -rw-rw-r-- 1 devasc devasc 776 Feb 1 20:48 README.md -rw-r--r-- 1 devasc devasc 1298 Feb 1 22:11 recursive_json_search.py -rw-r--r-- 1 devasc devasc 4735 Apr 23 2020 test_data.py -rw-r--r-- 1 devasc devasc 711 Feb 1 21:55 test_json_search.py -rw-rw-r-- 1 devasc devasc 352 Feb 1 21:33 unittest_questions.txt devasc@labvm:~/labs/devnet-src/unittest$The
__pycache__folder contains compiled byte-code versions of your modules to improve the speed of launching your application. Although useful, it is not a folder that should be tracked by your version control system. We can tell Git to ignore certain files and folders by creating a file in the root folder of your repository called.gitignore. -
First, verify that Git sees the
__pycache__folder as untracked usinggit status.devasc@labvm:~/labs/devnet-src/unittest$ git status On branch main Changes not staged for commit: (use "git add <file>..." to update what will be committed) (use "git restore <file>..." to discard changes in working directory) modified: recursive_json_search.py modified: test_json_search.py Untracked files: (use "git add <file>..." to include in what will be committed) __pycache__/ no changes added to commit (use "git add" and/or "git commit -a") devasc@labvm:~/labs/devnet-src/unittest$ -
Create a
.gitignorefile in the ~/labs/devnet-src/unittest folder. The . at the start of the filename is important, and means that the file will be hidden by default.devasc@labvm:~/labs/devnet-src/unittest$ touch .gitignore -
Add
__pycache__to the first line of the.gitignorefile, then verify the contents of the file (note that the folder name is two underscores before, and two underscores after, the wordpycache).devasc@labvm:~/labs/devnet-src/unittest$ echo "__pycache__" > .gitignore devasc@labvm:~/labs/devnet-src/unittest$ cat .gitignore __pycache__ devasc@labvm:~/labs/devnet-src/unittest$ -
Run
git statusagain to confirm that__pycache__is no longer being listed as an untracked folder, and instead you see the.gitignorefile listed.devasc@labvm:~/labs/devnet-src/unittest$ git status On branch main Changes not staged for commit: (use "git add <file>..." to update what will be committed) (use "git restore <file>..." to discard changes in working directory) modified: recursive_json_search.py modified: test_json_search.py Untracked files: (use "git add <file>..." to include in what will be committed) .gitignore no changes added to commit (use "git add" and/or "git commit -a") devasc@labvm:~/labs/devnet-src/unittest$ -
Add the
.gitignore, therecursive_json_search.py, and thetest_json_search.pyfiles to the staging area then commit the changes to the local repository using the message Lab complete!.devasc@labvm:~/labs/devnet-src/unittest$ git add . devasc@labvm:~/labs/devnet-src/unittest$ git commit -m "Lab complete!" [main 3c7e4e5] Lab complete! 3 files changed, 48 insertions(+), 1 deletion(-) create mode 100644 .gitignore devasc@labvm:~/labs/devnet-src/unittest$Note
The using
git addwith a single period (.) tells git to add all new, modified, and deleted files and folders to the staging area -
Push all the changes you made in the local repository back to the GitHub repository to complete the lab. Remember to use your Personal Access Token when asked for your GitHub password.
Tip
If you’ve configured your VM to use SSH to connect to GitHub instead of HTTPS, you will not be asked for a username and password, although you may be asked for a passphrase for your SSH key, if you configured one.
devasc@labvm:~/labs/devnet-src/unittest$ git push origin main Username for 'https://github.com': <username> Password for 'https://username@github.com': Enumerating objects: 20, done. Counting objects: 100% (20/20), done. Delta compression using up to 2 threads Compressing objects: 100% (16/16), done. Writing objects: 100% (17/17), 2.65 KiB | 903.00 KiB/s, done. Total 17 (delta 6), reused 0 (delta 0) remote: Resolving deltas: 100% (6/6), completed with 1 local object. To https://github.com/Ontario-Tech-NITS/lab-3-unit-testing-<username>.git a3978a6..305c231 main -> main -
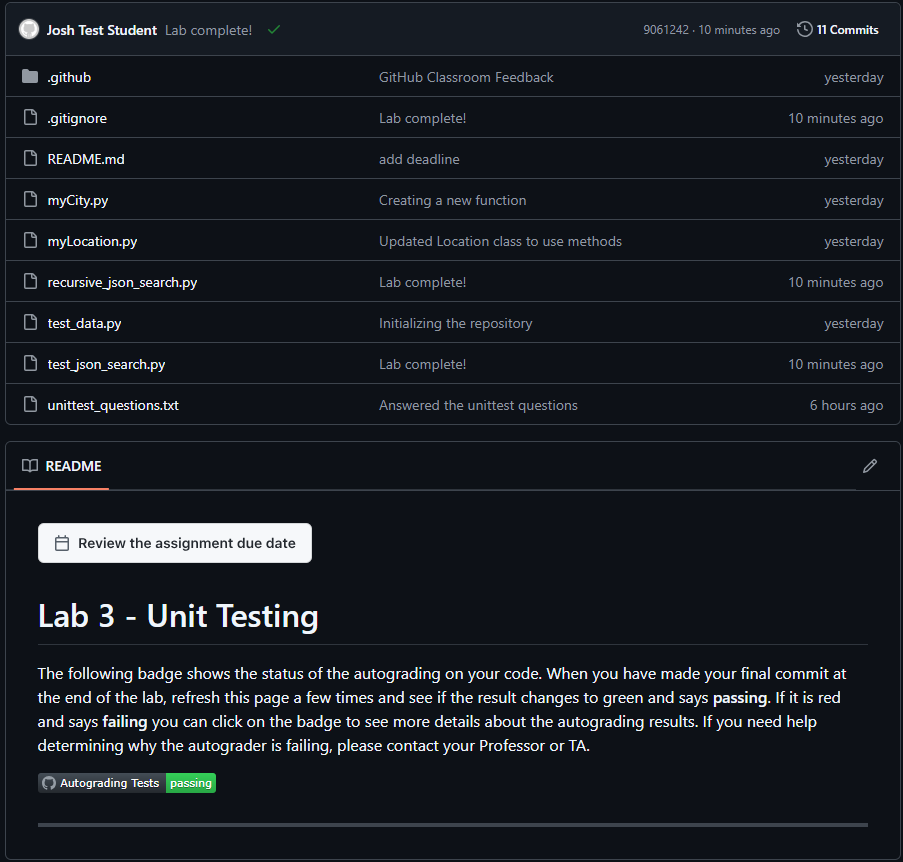
In your browser, return to the repository on github.com and verify all your changes are present, along with the corresponding commit messages. Wait a minute or so for the autograder tests to complete and ensure that it says passing in green.