Lab 2 - Data Parsing and Version Control🔗
Setup - Generate a GitHub Personal Access Token🔗
Authenticating to a private repository in GitHub uses a Personal Access Token with your username, rather than your account password. Before you can push or pull changes to or from a remote repository on GitHub you must create a personal access token.
-
Navigate to https://github.com/settings/tokens and log in.
-
Click the Generate new token button.
-
Select Generate new token (classic).
-
In the Note field, enter a description for this token (e.g., For INFR 3200U coursework).
-
Set the Expiration to 90 days.
-
In the Select Scopes box, select repo, which should check all the repo boxes below it automatically.
-
Click the Generate token button at the bottom of the window.
-
The new token will be displayed. Copy and paste it into a text file and save it somewhere you will remember.
Warning
You cannot see the token ever again and will have to regenerate it if you lose it.
Critical
NEVER save your token in a publicly accessible location, nor in any of your Git archives where it could accidentally be pushed to GitHub. Anyone with this token will have full control over your GitHub repos.
2.1 Software Version Control with Git🔗
Objectives🔗
Part 1: Launch the DEVASC VM
Part 2: Initializing Git
Part 3: Staging and Committing a File in the Git Repository
Part 4: Modifying the File and Tracking Changes
Part 5: Branches and Merging
Part 6: Handling Merge Conflicts
Part 7: Integrating Git with GitHub
Instructions🔗
Part 1: Launch the DEVASC VM🔗
If you have not already completed the Lab - Install the Virtual Machine Lab Environment, do so now. If you have already completed that lab, launch the DEVASC VM now.
Part 2: Initializing Git🔗
Step 1: Open a terminal in the DEVASC-LABVM🔗
Double-click the Terminal Emulator icon on the desktop.
Step 2: Update Git🔗
There have been many enhancements and bug fixes added to Git since the DEVASC VM was first created, so updating Git is a good first step.
-
Add the Git APT package repository to the DEVASC VM so that the latest versions of the Git packages are available for installation.
devasc@labvm:~$ sudo apt-add-repository ppa:git-core/ppa The most current stable version of Git for Ubuntu. For release candidates, go to https://launchpad.net/~git-core/+archive/candidate . More info: https://launchpad.net/~git-core/+archive/ubuntu/ppa Press [ENTER] to continue or Ctrl-c to cancel adding it. Enter <output omitted> Fetched 32.9 kB in 2s (21.1 kB/s) Reading package lists... Done devasc@labvm:~$ -
Use APT package management system to update the list of available packages. This may take a few moments.
devasc@labvm:~$ sudo apt update Get:1 http://security.ubuntu.com/ubuntu focal-security InRelease [128 kB] Hit:2 http://archive.ubuntu.com/ubuntu focal InRelease Get:3 http://archive.ubuntu.com/ubuntu focal-updates InRelease [128 kB] <output omitted> Fetched 23.0 MB in 10s (2,418 kB/s) Reading package lists... Done Building dependency tree Reading state information... Done 672 packages can be upgraded. Run 'apt list --upgradable' to see them. devasc@labvm:~$ -
Update Git to the latest version using APT.
devasc@labvm:~$ sudo apt install git Reading package lists... Done Building dependency tree Reading state information... Done The following additional packages will be installed: <output omitted> Setting up git (1:2.48.1-0ppa1~ubuntu20.04.1) ... Processing triggers for man-db (2.9.1-1) ... devasc@labvm:~$ -
Check the version of Git now installed. At the time of writing this lab, the version was 2.50.1. Ensure that your version is at least that high, if not higher.
devasc@labvm:~$ git --version
git version 2.50.1
devasc@labvm:~$
Step 3: Initialize a Git Repository🔗
-
Configure user information to be used for this local repository. This will associate your information with the work that you contribute to a local repository.
Note
Use your actual name in place of "Sample User" for the name in quotes. Use your ontariotechu.net e-mail address for the email field, unless your GitHub account uses a different e-mail address, in which case, use that e-mail address.
devasc@labvm:~$ git config --global user.name "Sample User" devasc@labvm:~$ git config --global user.email name@ontariotechu.net -
Historically, the first branch created in a new Git repository is called master. However, due to the negative connotations associated with that word, many organizations are moving away from using it in their software. GitHub uses main as the default name of the first branch of a new repository, so update Git to use main instead of master for the name of the first branch in all new repositories.
devasc@labvm:~$ git config --global init.defaultBranch main -
At any time, you can review these settings with the
git config --listcommand.devasc@labvm:~$ git config --list user.name=SampleUser user.email=name@ontariotechu.net init.defaultbranch=main devasc@labvm:~$ -
Use the
lscommand to display a listing of the current directory. Remember that commands are case-sensitive.devasc@labvm:~$ ls Desktop Documents Downloads labs snap devasc@labvm:~$ -
Use the
cdcommand to navigate to the devnet-src folder:devasc@labvm:~$ cd labs/devnet-src/ devasc@labvm:~/labs/devnet-src$ -
Make a directory git-intro and change directory into it:
devasc@labvm:~/labs/devnet-src$ mkdir git-intro devasc@labvm:~/labs/devnet-src$ cd git-intro devasc@labvm:~/labs/devnet-src/git-intro$ -
Use the
git initcommand to initialize the current directory (git-intro) as a Git repository. The message displayed indicates that you have created a local repository within your project contained in the hidden directory .git. This is where all your change history is located. You can see it with thels -acommand.devasc@labvm:~/labs/devnet-src/git-intro$ git init Initialized empty Git repository in /home/devasc/labs/devnet-src/git-intro/.git/ devasc@labvm:~/labs/devnet-src/git-intro$ ls -a . .. .git devasc@labvm:~/labs/devnet-src/git-intro$ -
As you work on your project, you will want to check to see which files have changed. This is helpful when you are committing files to the repo, and you do not want to commit all of them. The
git statuscommand displays modified files in the working directory that are staged for your next commit.devasc@labvm:~/labs/devnet-src/git-intro$ git status On branch main No commits yet nothing to commit (create/copy files and use "git add" to track) devasc@labvm:~/labs/devnet-src/git-intro$This message tells you:
-
That you are on branch called main. (Branches are discussed later in this lab)
-
There have not been any changes committed yet.
-
There are no changes to commit.
You will see that the status of your repo will change once you add files and start making changes.
-
Part 3: Staging and Committing a File in the Git Repository🔗
Step 1: Create a file🔗
-
The git-intro repository is created but empty. Using the
echocommand, create the file DEVASC.txt with the information contained in quotes.devasc@labvm:~/labs/devnet-src/git-intro$ echo "I am on my way to passing the Cisco DEVASC exam" > DEVASC.txt devasc@labvm:~/labs/devnet-src/git-intro$ -
Use the
ls -lacommand to verify the DEVASC.txt file, as well as the .git directory, are in the git-intro directory. Then usecatto display the contents of DEVASC.txt.devasc@labvm:~/labs/devnet-src/git-intro$ ls -la total 16 drwxrwxr-x 3 devasc devasc 4096 Apr 17 20:38 . drwxrwxr-x 5 devasc devasc 4096 Apr 17 19:50 .. -rw-rw-r-- 1 devasc devasc 48 Apr 17 20:38 DEVASC.txt drwxrwxr-x 7 devasc devasc 4096 Apr 17 19:57 .git devasc@labvm:~/src/git-intro$ cat DEVASC.txt I am on my way to passing the Cisco DEVASC exam devasc@labvm:~/labs/devnet-src/git-intro$
Step 2: Examine the Repository Status🔗
Examine the repository status using git status. Notice that Git found the new file in the directory and knows that it is not tracked.
devasc@labvm:~/labs/devnet-src/git-intro$ git status
On branch main

No commits yet

Untracked files:
    (use "git add <file>..." to include in what will be committed)
    DEVASC.txt

nothing added to commit but untracked files present (use "git add" to track)
devasc@labvm:~/labs/devnet-src/git-intro$
Step 3: Staging the File🔗
-
Next, use the
git addcommand to "stage" the DEVASC.txt file. Staging is an intermediate phase prior to committing a file to the repository with thegit commitcommand. This command creates a snapshot of the contents of the file at the time this command is entered. Any changes to the file require anothergit addcommand prior to committing the file.devasc@labvm:~/labs/devnet-src/git-intro$ git add DEVASC.txt -
Using the
git statuscommand again, notice the staged changes displayed as new file: DEVASC.txt.devasc@labvm:~/labs/devnet-src/git-intro$ git status On branch main No commits yet Changes to be committed: (use "git rm --cached <file>..." to unstage) new file: DEVASC.txt devasc@labvm:~/labs/devnet-src/git-intro$
Step 4: Committing a File🔗
Now that you have staged your changes, you will need to commit them to let Git know you want to start tracking those changes. Commit your staged content as a new commit snapshot by using the git commit command. The -m message switch enables you to add a message explaining the changes you've made.
devasc@labvm:~/labs/devnet-src/git-intro$ git commit -m "Committing DEVASC.txt to begin tracking changes"
[main (root-commit) b510f8e] Committing DEVASC.txt to begin tracking changes
  1 file changed, 1 insertion(+)
  create mode 100644 DEVASC.txt
devasc@labvm:~/labs/devnet-src/git-intro$
Note the number and letter combination in the first line of the output (b510f8e in the example). This is the commit ID. Every commit is identified by a unique SHA1 hash. The commit ID is the first seven characters of the full commit hash. Your commit ID will be different than the one displayed.
Step 5: Viewing the Commit History🔗
Use the git log command to show all commits in the current branch's history.
devasc@labvm:~/labs/devnet-src/git-intro$ git log
commit b510f8e5f9f63c97432d108a0413567552c07356 (HEAD -> main)
Author: Sample User <name@ontariotechu.net>
Date:   Sat Apr 18 18:03:28 2020 +0000

    Committing DEVASC.txt to begin tracking changes
devasc@labvm:~/labs/devnet-src/git-intro$
By default, all commits are made to the main branch. (Branches will be discussed later.) The first line is the commit hash with the commit ID as first seven characters. TThis is followed by your name and email address, the date of the commit and the message you included with the commit.
Part 4: Modifying the File and Tracking Changes🔗
Step 1: Modify the file🔗
-
Make a change to DEVASC.txt using the
echocommand. Be sure to use >> to append the existing file. Using > will overwrite the existing file. Use thecatcommand to view the modified file.devasc@labvm:~/labs/devnet-src/git-intro$ echo "I am beginning to understand Git!" >> DEVASC.txt -
Use the
catcommand to view the modified file.devasc@labvm:~/labs/devnet-src/git-intro$ cat DEVASC.txt I am on my way to passing the Cisco DEVASC exam I am beginning to understand Git! devasc@labvm:~/labs/devnet-src/git-intro$
Step 2: Verify the change to the repository🔗
Verify the change in the repository using the git status command.
devasc@labvm:~/labs/devnet-src/git-intro$ git status
On branch main
Changes not staged for commit:
  (use "git add <file>..." to update what will be committed)
  (use "git restore <file>..." to discard changes in working directory)
  modified:   DEVASC.txt

no changes added to commit (use "git add" and/or "git commit -a")
devasc@labvm:~/labs/devnet-src/git-intro$
Step 3: Stage the modified file🔗
The modified file will need to be staged again before it can be committed using the git add command again.
devasc@labvm:~/labs/devnet-src/git-intro$ git add DEVASC.txt
Step 4: Commit the staged file🔗
Commit the staged file using the git commit command. Notice the new commit ID.
devasc@labvm:~/labs/devnet-src/git-intro$ git commit -m "Added additional line to file"
[main 9f5c4c5] Added additional line to file
  1 file changed, 1 insertion(+)
devasc@labvm:~/labs/devnet-src/git-intro$
Step 5: Verify the changes in the repository🔗
-
Use the
git logcommand again to show all commits. Notice that the log contains the original commit entry along with the entry for the commit you just performed. The latest commit is shown first.devasc@labvm:~/labs/devnet-src/git-intro$ git log commit 9f5c4c5d630e88abe2a873fe48144e25ebe7bd6a (HEAD -> main) Author: Sample User <name@ontariotechu.net> Date: Sat Apr 18 19:17:50 2020 +0000 Added additional line to file commit b510f8e5f9f63c97432d108a0413567552c07356 Author: Sample User <name@ontariotechu.net> Date: Sat Apr 18 18:03:28 2020 +0000 Committing DEVASC.txt to begin tracking changes devasc@labvm:~/labs/devnet-src/git-intro$ -
When you have multiple entries in the log, you can compare the two commits using the
git diffcommand, adding the original commit ID first and the latest commit second:git diff <commit ID original> <commit ID latest>.Note
You will need to use the commit IDs from your own output, not the ones in the example below. The "+" sign at the end, followed by the text indicates the content that was appended to the file.
devasc@labvm:~/labs/devnet-src/git-intro$ git diff b510f8e 9f5c4c5
diff --git a/DEVASC.txt b/DEVASC.txt
index 93cd3fb..085273f 100644
--- a/DEVASC.txt
+++ b/DEVASC.txt
@@ -1 +1,2 @@
 I am on my way to passing the Cisco DEVASC exam
+I am beginning to understand Git!
devasc@labvm:~/labs/devnet-src/git-intro$
Tip
Commit IDs are SHA hashes of the commit information (details about the changes and author of the changes). The full hash is 40 characters long, but when referencing commit IDs in commands like
git diffyou can usually specify just the first 7 characters of the hash, as shown in the example above (b510f8e and 9f5c4c5). You will also see this short version of the commit ID in the output of some Git commands likegit commit.
Part 5: Branches and Merging🔗
When a repository is created, the files are automatically put in a branch called main. Whenever possible it is recommended to use branches rather than directly updating the main branch. Branching is used so that you can make changes in another area without affecting the main branch. This is done to help prevent accidental updates that might overwrite existing code.
Step 1: Create a new branch🔗
Create a new branch called feature using the git branch <branch-name> command.
devasc@labvm:~/labs/devnet-src/git-intro$ git branch feature
Step 2: Verify current branch🔗
Use the git branch command without a branch-name to display all the branches for this repository. The * next to the main branch indicates that this is the current branch – the branch that is currently "checked out".
devasc@labvm:~/labs/devnet-src/git-intro$ git branch
  feature
* main
devasc@labvm:~/labs/devnet-src/git-intro$
Step 3: Checkout the new branch🔗
Use the git checkout <branch-name> command to switch to the feature branch.
devasc@labvm:~/labs/devnet-src/git-intro$ git checkout feature
Step 4: Verify current branch🔗
-
Verify you have switched to the feature branch using the git branch command. Note the * next to the feature branch. This is now the working branch.
devasc@labvm:~/labs/devnet-src/git-intro$ git branch * feature main devasc@labvm:~/labs/devnet-src/git-intro$ -
Append a new line of text to the DEVASC.txt file, again using the
echocommand with the >> signs.devasc@labvm:~/labs/devnet-src/git-intro$ echo "This text was added originally while in the feature branch" >> DEVASC.txt -
Verify the line was appended to the file using the
catcommand.devasc@labvm:~/labs/devnet-src/git-intro$ cat DEVASC.txt I am on my way to passing the Cisco DEVASC exam I am beginning to understand Git! This text was added originally while in the feature branch devasc@labvm:~/labs/devnet-src/git-intro$
Step 5: Stage the modified file in the feature branch🔗
-
Stage the updated file to the current feature branch.
devasc@labvm:~/labs/devnet-src/git-intro$ git add DEVASC.txt -
Use the
git statuscommand and notice the modified file DEVASC.txt is staged in the feature branch.devasc@labvm:~/labs/devnet-src/git-intro$ git status On branch feature Changes to be committed: (use "git restore --staged <file>..." to unstage) modified: DEVASC.txt devasc@labvm:~/labs/devnet-src/git-intro$
Step 6: Commit the staged file in the feature branch🔗
-
Commit the staged file using the
git commitcommand. Notice the new commit ID and your message.devasc@labvm:~/labs/devnet-src/git-intro$ git commit -m "Added a third line in feature branch" [feature cd828a7] Added a third line in feature branch 1 file changed, 1 insertion(+) devasc@labvm:~/labs/devnet-src/git-intro$ -
Use the
git logcommand to show all commits including the commit you just did to the feature branch. The prior commit was done within the main branch.devasc@labvm:~/labs/devnet-src/git-intro$ git log commit cd828a73102cf308981d6290113c358cbd387620 (HEAD -> feature) Author: Sample User <name@ontariotechu.net> Date: Sat Apr 18 22:59:48 2020 +0000 Added a third line in feature branch commit 9f5c4c5d630e88abe2a873fe48144e25ebe7bd6a (main) Author: Sample User <name@ontariotechu.net> Date: Sat Apr 18 19:17:50 2020 +0000 Added additional line to file commit b510f8e5f9f63c97432d108a0413567552c07356 Author: Sample User <name@ontariotechu.net> Date: Sat Apr 18 18:03:28 2020 +0000 Committing DEVASC.txt to begin tracking changes devasc@labvm:~/labs/devnet-src/git-intro$
Step 7: Checkout the main branch🔗
Switch to the main branch using the git checkout main command and verify the current working branch using the git branch command.
devasc@labvm:~/labs/devnet-src/git-intro$ git checkout main
Switched to branch 'main'
devasc@labvm:~/labs/devnet-src/git-intro$ git branch
feature
* main
devasc@labvm:~/labs/devnet-src/git-intro$
Step 8: Merge file contents from feature to main branch🔗
-
Branches are often used when implementing new features or fixes. They can be submitted for review by team members, and then once verified, can be pulled into the main codebase – the main branch.
Merge the contents (known as the history) from the feature branch into the main branch using the
git merge <branch-name>command. The branch-name is the branch that histories are pulled from into the current branch. The output displays that one file was changed with one line inserted.devasc@labvm:~/labs/devnet-src/git-intro$ git merge feature Updating 9f5c4c5..cd828a7 Fast-forward DEVASC.txt | 1 + 1 file changed, 1 insertion(+) devasc@labvm:~/labs/devnet-src/git-intro$ -
Verify the appended content to the DEVASC.txt file in the main branch using the
catcommand.devasc@labvm:~/labs/devnet-src/git-intro$ cat DEVASC.txt I am on my way to passing the Cisco DEVASC exam I am beginning to understand Git! This text was added originally while in the feature branch devasc@labvm:~/labs/devnet-src/git-intro$
Step 9: Deleting a branch🔗
-
Verify the feature branch is still available using the
git branchcommand.devasc@labvm:~/labs/devnet-src/git-intro$ git branch feature * main devasc@labvm:~/labs/devnet-src/git-intro$ -
Delete the feature branch using the
git branch -d <branch-name>command.devasc@labvm:~/labs/devnet-src/git-intro$ git branch -d feature Deleted branch feature (was cd828a7). devasc@labvm:~/labs/devnet-src/git-intro$ -
Verify the feature branch is no longer available using the
git branchcommand.devasc@labvm:~/labs/devnet-src/git-intro$ git branch * main devasc@labvm:~/labs/devnet-src/git-intro$
Part 6: Handling Merge Conflicts🔗
At times, you may experience a merge conflict. This is when you may have made overlapping changes to a file, and Git cannot automatically merge the changes.
Step 1: Create a new branch test🔗
Create a new branch test.
devasc@labvm:~/labs/devnet-src/git-intro$ git branch test
Step 2: Checkout the branch test🔗
-
Checkout (switch to) the branch test.
devasc@labvm:~/labs/devnet-src/git-intro$ git checkout test Switched to branch 'test' devasc@labvm:~/labs/devnet-src/git-intro$ -
Verify the working branch is the test branch.
devasc@labvm:~/labs/devnet-src/git-intro$ git branch main * test devasc@labvm:~/labs/devnet-src/git-intro$
Step 3: Verify the current contents of DEVASC.txt🔗
Verify the current contents of the DEVASC.txt file. Notice the first line includes the word Cisco.
devasc@labvm:~/labs/devnet-src/git-intro$ cat DEVASC.txt
I am on my way to passing the Cisco DEVASC exam
I am beginning to understand Git!
This text was added originally while in the feature branch
devasc@labvm:~/labs/devnet-src/git-intro$
Step 4: Modify the contents of DEVASC.txt in the test branch🔗
Use the sed command to change the word Cisco to NetAcad in the DEVASC.txt file.
devasc@labvm:~/labs/devnet-src/git-intro$ sed -i 's/Cisco/NetAcad/' DEVASC.txt
Note
sed is a stream editor that allows you to (among other things) modify the contents of a file without opening it in an editor. In this example, you are telling sed to replace all instances of Cisco with NetAcad in the file DEVASC.txt.
Step 5: Verify the contents of the modified DEVASC.txt in the test branch🔗
Verify the change to the DEVASC.txt file.
devasc@labvm:~/labs/devnet-src/git-intro$ cat DEVASC.txt
I am on my way to passing the NetAcad DEVASC exam
I am beginning to understand Git!
This text was added originally while in the feature branch
devasc@labvm:~/labs/devnet-src/git-intro$
Step 6: Stage and commit the test branch🔗
Stage and commit the file with a single git commit -a command. The -a option only affects files that have been modified and deleted. It does not affect new files.
devasc@labvm:~/labs/devnet-src/git-intro$ git commit -a -m "Change Cisco to NetAcad"
[test b6130a6] Change Cisco to NetAcad
  1 file changed, 1 insertion(+), 1 deletion(-)
devasc@labvm:~/labs/devnet-src/git-intro$
Step 7: Checkout the main branch🔗
-
Checkout (switch to) the main branch.
devasc@labvm:~/labs/devnet-src/git-intro$ git checkout main Switched to branch 'main' devasc@labvm:~/labs/devnet-src/git-intro$ -
Verify that the main branch is your current working branch.
devasc@labvm:~/labs/devnet-src/git-intro$ git branch
* main
  test
devasc@labvm:~/labs/devnet-src/git-intro$
Step 8: Modify the contents of DEVASC.txt in the main branch🔗
Use the sed command to change the word Cisco to DevNet in the DEVASC.txt file.
devasc@labvm:~/labs/devnet-src/git-intro$ sed -i 's/Cisco/DevNet/' DEVASC.txt
Step 9: Verify the contents of the modified DEVASC.txt in the main branch🔗
Verify the change to the file.
devasc@labvm:~/labs/devnet-src/git-intro$ cat DEVASC.txt
I am on my way to passing the DevNet DEVASC exam
I am beginning to understand Git!
This text was added originally while in the feature branch
devasc@labvm:~/labs/devnet-src/git-intro$
Step 10: Stage and commit the main branch🔗
Stage and commit the file using the git commit -a command.
devasc@labvm:~/labs/devnet-src/git-intro$ git commit -a -m "Changed Cisco to DevNet"
[main 72996c0] Changed Cisco to DevNet
  1 file changed, 1 insertion(+), 1 deletion(-)
devasc@labvm:~/labs/devnet-src/git-intro$
Step 11: Attempt to merge the test branch into the main branch🔗
Attempt to merge the test branch history into the main branch.
devasc@labvm:~/labs/devnet-src/git-intro$ git merge test
Auto-merging DEVASC.txt
CONFLICT (content): Merge conflict in DEVASC.txt
Automatic merge failed; fix conflicts and then commit the result.
devasc@labvm:~/labs/devnet-src/git-intro$
Step 12: Find the conflict🔗
-
Use the
git logcommand to view the commits. Notice that the HEAD version is the main branch. This will be helpful in the next step.devasc@labvm:~/labs/devnet-src/git-intro$ git log commit 72996c09fa0ac5dd0b8ab9ec9f8530ae2c5c4eb6 (HEAD -> main) Author: Sample User <name@ontariotechu.net> Date: Sun Apr 19 00:36:05 2020 +0000 Changed Cisco to DevNet <output omitted> -
Use the
catcommand to view the contents of the DEVASC.txt file. The file now contains information to help you find the conflict. The HEAD version (main branch) containing the word DevNet is conflicting with the test branch version and the word NetAcad.devasc@labvm:~/labs/devnet-src/git-intro$ cat DEVASC.txt <<<<<<< HEAD I am on my way to passing the DevNet DEVASC exam ======= I am on my way to passing the NetAcad DEVASC exam >>>>>>> test I am beginning to understand Git! This text was added originally while in the feature branch devasc@labvm:~/labs/devnet-src/git-intro$
Step 13: Manually edit the DEVASC.txt file to remove the conflicting text🔗
-
Use the
vimcommand to edit the file.devasc@labvm:~/labs/devnet-src/git-intro$ vim DEVASC.txt -
Use the Up and Down keys to move the cursor between lines. Press D D on the highlighted lines below to delete them:
<<<<<<< HEAD                                           #DELETE THIS LINE
I am on my way to passing the DevNet DEVASC exam
=======                                                #DELETE THIS LINE
I am on my way to passing the NetAcad DEVASC exam      #DELETE THIS LINE
>>>>>>> test                                           #DELETE THIS LINE
I am beginning to understand Git!
This text was added originally while in the feature branch
Note
D D is the key combination used in vim to delete the entire line that is currently under the cursor
-
Save your changes in vim by pressing Esc and then : followed by
wq(short for "write" and "quit") and pressing Enter.
Step 14: Verify your edits of DEVASC.txt in the main branch🔗
Verify your changes using the cat command.
devasc@labvm:~/labs/devnet-src/git-intro$ cat DEVASC.txt
I am on my way to passing the DevNet DEVASC exam
I am beginning to understand Git!
This text was added originally while in the feature branch
devasc@labvm:~/labs/devnet-src/git-intro$
Step 15: Stage and commit the main branch🔗
Stage and commit DEVASC.txt to the main branch using the git commit command.
devasc@labvm:~/labs/devnet-src/git-intro$ git add DEVASC.txt
devasc@labvm:~/labs/devnet-src/git-intro$ git commit -m "Manually merged from test branch"
[main 22d3da4] Manually merged from test branch
devasc@labvm:~/labs/devnet-src/git-intro$
Step 16: Verify the commit🔗
Use the git log command to verify the commit. If necessary, you can use Q to quit out of the git log display.
devasc@labvm:~/labs/devnet-src/git-intro$ git log
commit 22d3da41e00549ce69dc145a84884af6a1697734 (HEAD -> main)
Merge: 72996c0 b6130a6
Author: Sample User <name@ontariotechu.net>
Date:   Sun Apr 19 01:09:53 2020 +0000

    Manually merged from test branch
<output omitted>
Part 7: Integrating Git with GitHub🔗
So far, all the changes you have made to your file have been stored in a Git repository on your local machine. Git runs locally and does not require any central file server or cloud-based hosting service. Git allows a user to store and manage files locally.
Although Git is useful for a single user, integrating the local Git repository with a cloud-based server like GitHub is helpful when working within a team. Each team member keeps a copy of the repository on their local machine and updates the central cloud-based repository to share any changes.
There are several popular Git services, including GitHub, Stash from Atlassian, and GitLab. Because it is readily accessible, you will use GitHub in these examples.
Step 1: Log into your GitHub Account🔗
Open a web browser and log into your GitHub account (https://www.github.com).
Step 2: Create a Repository🔗
-
Select the New repository button or click on the + icon in the upper right corner and select New repository.
-
Create a repository using the following information:
- Repository name: devasc-study-team
- Description: Working together to pass the DEVASC exam
- Public/Private: Private
-
Select Create repository
Step 3: Create a new directory called devasc-study-team🔗
-
If you are not already in the git-intro directory, change to it now.
devasc@labvm:~$ cd ~/labs/devnet-src/git-intro -
Make a new directory called devasc-study-team. The directory does not have to match the name of the repository.
devasc@labvm:~/labs/devnet-src/git-intro$ mkdir devasc-study-team
Step 4: Change directory to devasc-study-team🔗
Use the cd command to change directories to devasc-study-team.
devasc@labvm:~/labs/devnet-src/git-intro$ cd devasc-study-team
devasc@labvm:~/labs/devnet-src/git-intro/devasc-study-team$
Step 5: Copy the DEVASC file🔗
-
Use the
cpcommand to copy the DEVASC.txt from the git-intro parent directory to the devasc-study-team sub-directory. Do not miss the space and period at the end of the command.devasc@labvm:~/labs/devnet-src/git-intro/devasc-study-team$ cp ../DEVASC.txt .Note
The two periods and a slash prior to the filename indicates the parent directory. The period following the file name indicates copying the file into the current directory using the same file name.
-
Verify the file was copied with the
lscommand and the contents of the file with thecatcommand.devasc@labvm:~/labs/devnet-src/git-intro/devasc-study-team$ ls DEVASC.txt devasc@labvm:~/labs/devnet-src/git-intro/devasc-study-team$ cat DEVASC.txt I am on my way to passing the DevNet DEVASC exam I am beginning to understand Git! This text was added originally while in the feature branch devasc@labvm:~/labs/devnet-src/git-intro/devasc-study-team$
Step 6: Initialize a new Git repository🔗
-
Use the
git initcommand to initialize the current directory (devasc-study-team) as a Git repository.devasc@labvm:~/labs/devnet-src/git-intro/devasc-study-team$ git init Initialized empty Git repository in /home/devasc/labs/devnet-src/git-intro/devasc-study-team/.git/ devasc@labvm:~/labs/devnet-src/git-intro/devasc-study-team$Note
The message displayed indicates that you have created a local repository within your project contained in the hidden directory .git. This is where all your change history is located.
-
Next, check your global git variables with the
git config --listcommand.devasc@labvm:~/labs/devnet-src/git-intro/devasc-study-team$ git config --list user.name=SampleUser user.email=name@ontariotechu.net init.defaultbranch=main core.repositoryformatversion=0 core.filemode=true core.bare=false core.logallrefupdates=true devasc@labvm:~/labs/devnet-src/git-intro/devasc-study-team$ -
If the user.email variable does not match your GitHub e-mail, change it now.
devasc@labvm:~$ git config --global user.email GitHub-email-address
Step 7: Point the Git repository to a GitHub repository🔗
-
Use the
git remote addcommand to add a Git URL as a remote alias. The value origin is an alias that will point to the newly created repository on GitHub. Use your GitHub username in the URL path for<username>.devasc@labvm:~/labs/devnet-src/git-intro/devasc-study-team$ git remote add origin https://github.com/<username>/devasc-study-team.gitWarning
Your username is case-sensitive.
-
Verify the remote is running on github.com.
devasc@labvm:~/labs/devnet-src/git-intro/devasc-study-team$ git remote --verbose origin https://github.com/username/devasc-study-team.git (fetch) origin https://github.com/username/devasc-study-team.git (push) devasc@labvm:~/labs/devnet-src/git-intro/devasc-study-team$ -
View the git log. The error indicates that there are no commits.
devasc@labvm:~/labs/devnet-src/git-intro/devasc-study-team$ git log
fatal: your current branch 'main' does not have any commits yet
Step 8: Stage and Commit the DEVASC.txt file🔗
-
Use the
git addcommand to stage the DEVASC.txt file.devasc@labvm:~/labs/devnet-src/git-intro/devasc-study-team$ git add DEVASC.txt -
Use
git commitcommand to commit the DEVASC.txt file.devasc@labvm:~/labs/devnet-src/git-intro/devasc-study-team$ git commit -m "Add DEVASC.txt file to devasc-study-team" [main (root-commit) c60635f] Add DEVASC.txt file to devasc-study-team 1 file changed, 3 insertions(+) create mode 100644 DEVASC.txt devasc@labvm:~/labs/devnet-src/git-intro/devasc-study-team$
Step 9: Verify the commit🔗
-
Use the
git logcommand to verify the commit.devasc@labvm:~/labs/devnet-src/git-intro/devasc-study-team$ git log commit c60635fe4a1f85667641afb9373e7f49a287bdd6 (HEAD -> main) Author: username <user@example.com> Date: Mon Apr 20 02:48:21 2020 +0000 Add DEVASC.txt file to devasc-study-team devasc@labvm:~/labs/devnet-src/git-intro/devasc-study-team$ -
Use the
git statuscommand to view status information. The phrase "working tree clean" means that Git has compared your file listing to what you've told Git, and it's a clean slate with nothing new to report.devasc@labvm:~/labs/devnet-src/git-intro/devasc-study-team$ git status On branch main nothing to commit, working tree clean devasc@labvm:~/labs/devnet-src/git-intro/devasc-study-team$
Step 10: Send (push) the file from Git to GitHub🔗
Use the git push origin main command to send (push) the file to your GitHub repository. You will be prompted for your GitHub account username and password. When authenticating the git operations to GitHub, you need to use a Personal Access Token instead of using your GitHub account password.
devasc@labvm:~/labs/devnet-src/git-intro/devasc-study-team$ git push origin main
Username for 'https://github.com': username
Password for 'https://username@github.com': Personal Access Token
Enumerating objects: 3, done.
Counting objects: 100% (3/3), done.
Delta compression using up to 2 threads
Compressing objects: 100% (2/2), done.
Writing objects: 100% (3/3), 347 bytes | 347.00 KiB/s, done.
Total 3 (delta 0), reused 0 (delta 0)
To https://github.com/username/devasc-study-team.git
  * [new branch]      main -> main
devasc@labvm:~/labs/devnet-src/git-intro/devasc-study-team$
Note
If, after entering your username and password, you get a fatal error stating the repository is not found, you most likely entered an incorrect URL. You will need to reverse your git remote add command with the git remote rm origin command, then add it again with the correct URL.
Step 11: Verify file on GitHub🔗
-
Go to your GitHub account and under Repositories select username/devasc-study-team.
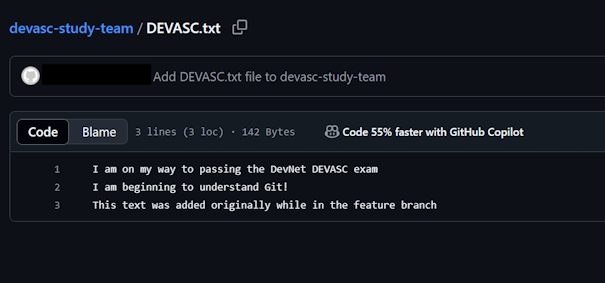
-
You should see that the DEVASC.txt file has been added to this GitHub repository. Click on the file to view the contents.
2.2 Set up GitHub Repository🔗
Objectives🔗
Part 1: Join the GitHub Classroom
Part 2: Initialize the Local Repository
Part 3: Set up the Remote Repository
Instructions🔗
Part 1: Join the GitHub Classroom🔗
-
Follow the GitHub assignment link posted in Canvas and authorize GitHub Classroom to link with your account.
-
When prompted, select your name from the list of students.
-
Accept the assignment and wait until it says your repository has been created. Click the link to proceed to the repository.
Important
GitHub Classroom is currently experiencing a bug where you might receive a Repository Access Issue error after accepting the assignment. If this happens, check the e-mail connected to your GitHub account for an invitation e-mail from GitHub. Use the View Invitation link in the e-mail to see the link to accept the invitation and proceed to the repository.
-
Select the Code dropdown and copy the HTTPS URL. Store it somewhere for use in a later step.
Tip
If you've configured your VM to use SSH to connect to GitHub instead of HTTPS, click on the Code dropdown, select the SSH tab, and copy the URL from there instead.
Part 2: Initialize the Local Repository🔗
You will be creating a local repository from a folder on the DEVASC VM. This folder already contains some files, so you will need to initialize a repository in the folder, pull down the files from the remote GitHub Classroom repository, then add the local files to the local repository to combine the remote and local files into a single repository.
-
Inside the DEVASC VM, open a terminal and change to the ~/labs/devnet-src/parsing directory.
devasc@labvm:~$ cd labs/devnet-src/parsing/ devasc@labvm:~/labs/devnet-src/parsing$ -
View the listing of all files currently in the parsing directory.
devasc@labvm:~/labs/devnet-src/parsing$ ls -la total 32 drwxr-xr-x 2 devasc devasc 4096 Jan 26 21:00 . drwxr-xr-x 14 devasc devasc 4096 Jan 23 15:05 .. -rw-rw-r-- 1 devasc devasc 230 Jan 26 20:59 myfile.json -rw-rw-r-- 1 devasc devasc 438 Jan 26 20:59 myfile.xml -rw-rw-r-- 1 devasc devasc 215 Jan 26 20:59 myfile.yaml -rw-rw-r-- 1 devasc devasc 61 Jan 26 21:05 parsejson.py -rw-rw-r-- 1 devasc devasc 60 Jan 26 21:05 parsexml.py -rw-rw-r-- 1 devasc devasc 61 Jan 26 21:05 parseyaml.py -
Initialize this directory as a Git repository (don’t miss the . at the end of the command).
devasc@labvm: :~/labs/devnet-src/parsing$ git init .
Initialized empty Git repository in /home/devasc/labs/devnet-src/parsing/.git/
Part 3: Set up the Remote Repository🔗
Since we initialized our own local repository, rather than cloning an existing remote repository, we need to tell Git the location of the remote repository to synchronize with.
-
Configure the location of the remote repository using the
git remote addcommand. Use the URL to the GitHub Classroom repository you copied at the end of Part 1.devasc@labvm: :~/labs/devnet-src/parsing$ git remote add origin https://github.com/Ontario-Tech-NITS/lab-2-data-parsing-and-version-control-w2025-<username>.gitWarning
Make sure to use your own repository URL, not the one in the command example above
-
Verify that the remote is properly configured with the
git remote --verbosecommand.devasc@labvm: :~/labs/devnet-src/parsing$ git remote --verbose origin https://github.com/Ontario-Tech-NITS/lab-2-data-parsing-and-version-control-w2025-<username>.git (fetch) origin https://github.com/Ontario-Tech-NITS/lab-2-data-parsing-and-version-control-w2025-<username>.git (push) -
Pull down the files from the remote repository into the local repository. Remember to use your Personal Access Token as the password. A single new file (README.md) will be added to the working directory, along with a .github folder.
devasc@labvm: :~/labs/devnet-src/parsing$ git pull origin main Username for 'https://github.com': <username> Password for 'https://username@github.com': <Personal Access Token> remote: Enumerating objects: 29, done. remote: Counting objects: 100% (29/29), done. remote: Compressing objects: 100% (20/20), done. remote: Total 29 (delta 3), reused 4 (delta 0), pack-reused 0 (from 0) Unpacking objects: 100% (29/29), 8.46 KiB | 577.00 KiB/s, done. From https://github.com/Ontario-Tech-NITS/lab-2-data-parsing-and-version-control-w2025-<username> * branch main -> FETCH_HEAD * [new branch] main -> origin/main -
Use
git statusto verify all the local files are currently untracked.devasc@labvm: :~/labs/devnet-src/parsing$ git status On branch main Untracked files: (use "git add <file>..." to include in what will be committed) myfile.json myfile.xml myfile.yaml parsejson.py parsexml.py parseyaml.py nothing added to commit but untracked files present (use "git add" to track) -
Add the files from the local working folder to the staging area (don’t miss the . at the end of the command).
devasc@labvm: :~/labs/devnet-src/parsing$ git add . -
Commit these new files to the local repository. Use the commit message Initializing the repository.
devasc@labvm: :~/labs/devnet-src/parsing$ git commit -m "Initializing the repository" [main 8404809] Initializing the repository 6 files changed, 31 insertions(+) create mode 100644 myfile.json create mode 100644 myfile.xml create mode 100644 myfile.yaml create mode 100644 parsejson.py create mode 100644 parsexml.py create mode 100644 parseyaml.py -
Use
git statusagain to verify that all files have been committed to the local repository and that you are working on a clean tree.devasc@labvm: :~/labs/devnet-src/parsing$ git status On branch main nothing to commit, working tree cleanNote
At the very end of this lab you will push your repository up to GitHub, where it will be automatically graded. The instructions will tell you when to push your code.
2.3 Explore Python Development Tools🔗
Objectives🔗
Part 1: Review the Python Installation
Part 2: PIP and Python Virtual Environments
Part 3: Sharing Your Virtual Environment
Instructions🔗
Part 1: Review the Python Installation🔗
-
In the DEVASC VM, you can check the version of Python already installed with the
python3 -Vcommand (capital V).devasc@labvm:~/labs/devnet-src/parsing$ python3 -V Python 3.8.2 devasc@labvm:~/labs/devnet-src/parsing$ -
To see the directory for the local Python environment, use the
which python3command.devasc@labvm:~/labs/devnet-src/parsing$ which python3 /usr/bin/python3 devasc@labvm:~/labs/devnet-src/parsing$
Part 2: PIP and Python Virtual Environments🔗
PIP stands for Pip Installs Packages. Many people first learn about PIP and start using pip install commands on the system-wide Python installation. When you run the pip install command on your system, you might introduce competing dependencies in your system installation that you may or may not want for all Python projects.
Therefore, the best practice is to enable a Python virtual environment. Then, install only the packages that are needed for the project in that virtual environment. That way you know exactly which packages are installed in a given setting. You can switch those package dependencies easily when switching to a new virtual environment, and not break or cause problems due to competing versions of software.
To install a Python virtual environment, use the venv tool in Python 3 and then activate the virtual environment, as shown in the following steps.
Step 1: Create a Python 3 virtual environment🔗
-
Inside the DEVASC VM, change to the labs/devnet-src/parsing directory if you are not already there.
devasc@labvm:~$ cd labs/devnet-src/parsing/ devasc@labvm:~/labs/devnet-src/parsing$ -
Enter the following command to use the
venvtool to create a Python 3 virtual environment with the name devfun. The-mswitch tells Python to run the venv module. The name is arbitrary and chosen by the programmer.devasc@labvm:~/labs/devnet-src/parsing$ python3 -m venv devfun devasc@labvm:~/labs/devnet-src/parsing$
Step 2: Activate and test the Python 3 virtual environment🔗
-
Activate the virtual environment. The prompt changes to indicate the name of the environment you are currently working in, which is devfun in this example. Now when you use the
pip3 installcommand form here, the system will only install packages for the active virtual environment.devasc@labvm:~/labs/devnet-src/parsing$ source devfun/bin/activate (devfun) devasc@labvm:~/labs/devnet-src/parsing$ -
The
pip3 freezecommand outputs a list of installed Python packages in the current environment. Run thepip3 freezecommand to verify that there are no additional Python packages currently installed in the devfun environment.(devfun) devasc@labvm:~/labs/devnet-src/parsing$ pip3 freeze (devfun) devasc@labvm:~/labs/devnet-src/parsing$ -
Now install the Python requests package and its dependencies within the devfun environment.
(devfun) devasc@labvm:~/labs/devnet-src/parsing$ pip3 install requests Collecting requests Downloading requests-2.23.0-py2.py3-none-any.whl (58 kB) |████████████████████████████████| 58 kB 290 kB/s Collecting urllib3!=1.25.0,!=1.25.1,<1.26,>=1.21.1 Downloading urllib3-1.25.9-py2.py3-none-any.whl (126 kB) |████████████████████████████████| 126 kB 1.7 MB/s Collecting idna<3,>=2.5 Downloading idna-2.9-py2.py3-none-any.whl (58 kB) |████████████████████████████████| 58 kB 18.3 MB/s Collecting certifi>=2017.4.17 Downloading certifi-2020.4.5.1-py2.py3-none-any.whl (157 kB) |████████████████████████████████| 157 kB 19.8 MB/s Collecting chardet<4,>=3.0.2 Downloading chardet-3.0.4-py2.py3-none-any.whl (133 kB) |████████████████████████████████| 133 kB 59.2 MB/s Installing collected packages: urllib3, idna, certifi, chardet, requests Successfully installed certifi-2020.4.5.1 chardet-3.0.4 idna-2.9 requests-2.23.0 urllib3-1.25.9 (devfun) devasc@labvm:~/labs/devnet-src/parsing$ -
Re-run the
pip3 freezecommand to see the packages now installed in the devfun environment.(devfun) devasc@labvm:~/labs/devnet-src/parsing$ pip3 freeze certifi==2024.12.14 charset-normalizer==3.4.1 idna==3.10 requests==2.32.3 urllib3==2.2.3 (devfun) devasc@labvm:~/labs/devnet-src/parsing$Note
Your list of packages and version numbers may be slightly different.
-
To deactivate the virtual environment and go back to your system, enter the
deactivatecommand.(devfun) devasc@labvm:~/labs/devnet-src/parsing$ deactivate devasc@labvm:~/labs/devnet-src/parsing$
Step 3: Check the current packages installed in the system environment🔗
-
Enter the system wide
python3 -m pip freezecommand to see what packages are installed in the system environment. There are much more packages installed in the system environment than your devfun environmentdevasc@labvm:~/labs/devnet-src/parsing$ python3 -m pip freeze aiohttp==3.6.2 ansible==2.9.9 apache-libcloud==2.8.0 appdirs==1.4.3 apturl==0.5.2 argcomplete==1.8.1 arrow==0.15.6 astroid==2.3.3 <output omitted> xmltodict==0.12.0 yamllint==1.23.0 yarl==1.4.2 zipp==1.0.0 devasc@labvm:~/labs/devnet-src/parsing$Note
Because Python3 is specifically invoked with the above command, you only use
pipinstead ofpip3. -
If you want to quickly find the version of a package installed, pipe the output to the
grepcommand. Enter the following to see the version of the requests package currently installed.devasc@labvm:~/labs/devnet-src/parsing$ python3 -m pip freeze | grep requests requests==2.22.0 requests-kerberos==0.12.0 requests-ntlm==1.1.0 requests-toolbelt==0.9.1 requests-unixsocket==0.2.0 devasc@labvm:~/labs/devnet-src/parsing$
Part 3: Sharing Your Virtual Environment🔗
The output of the pip3 freeze command is in a specific format for a reason. You can use all the dependencies listed so that other people who want to work on the same project as you can get the same environment as yours.
A developer can create a requirements file, such as requirements.txt, by using the pip3 freeze > requirements.txt command. Then another developer can, from another activated virtual environment, use this pip3 install -r requirements.txt command to install the packages required by the project.
-
Re-activate the devfun virtual environment.
devasc@labvm:~/labs/devnet-src/parsing$ source devfun/bin/activate (devfun) devasc@labvm: -
Send the output of the
pip3 freezecommand to a text file called requirements.txt.(devfun) devasc@labvm:~/labs/devnet-src/parsing$ pip3 freeze > requirements.txtNote
The filename used for pip dependencies can be anything, but requirements.txt is generally the standard filename.
-
Deactivate the devfun virtual environment. You can use the
lscommand to see that the requirements.txt file is in the /python directory.(devfun) devasc@labvm:~/labs/devnet-src/parsing$ deactivate devasc@labvm:~/labs/devnet-src/parsing$ ls devfun file-access-input.py if-acl.py requirements.txt <--- devices.txt file-access.py if-vlan.py while-loop.py devnew hello-world.py person-info.py -
Create and activate a new Python virtual environment called devnew.
devasc@labvm:~/labs/devnet-src/parsing$ python3 -m venv devnew devasc@labvm:~/labs/devnet-src/parsing$ source devnew/bin/activate (devnew) devasc@labvm:~/labs/devnet-src/parsing$ -
Use the
pip3 install -r requirements.txtcommand to install the same packages that are installed in the devfun virtual environment.(devnew) devasc@labvm:~/labs/devnet-src/parsing$ pip3 install -r requirements.txt Collecting certifi==2024.12.14 Using cached certifi-2024.12.14-py3-none-any.whl (164 kB) Collecting charset-normalizer==3.4.1 Using cached charset_normalizer-3.4.1-cp38-cp38-manylinux_2_17_x86_64.manylinux2014_x86_64.whl (144 kB) Collecting idna==3.10 Using cached idna-3.10-py3-none-any.whl (70 kB) Collecting requests==2.32.3 Using cached requests-2.32.3-py3-none-any.whl (64 kB) Collecting urllib3==2.2.3 Using cached urllib3-2.2.3-py3-none-any.whl (126 kB) Installing collected packages: certifi, charset-normalizer, idna, urllib3, requests Successfully installed certifi-2024.12.14 charset-normalizer-3.4.1 idna-3.10 requests-2.32.3 urllib3-2.2.3 (devnew) devasc@labvm:~/labs/devnet-src/parsing$ -
When entering
pip3 freezein the devnew environment, you should see the following output (again, your list of packages and version numbers may be slightly different).(devnew) devasc@labvm:~/labs/devnet-src/parsing$ pip3 freeze certifi==2024.12.14 charset-normalizer==3.4.1 idna==3.10 requests==2.32.3 urllib3==2.2.3 (devnew) devasc@labvm:~/labs/devnet-src/parsing$ -
Deactivate the devnew virtual environment.
(devnew) devasc@labvm:~/labs/devnet-src/parsing$ deactivate devasc@labvm:~/labs/devnet-src/parsing$ -
Use 1git status1 to see the new untracked files from this lab.
devasc@labvm:~/labs/devnet-src/parsing$ git status On branch main Untracked files: (use "git add <file>..." to include in what will be committed) devfun/ devnew/ requirements.txt nothing added to commit but untracked files present (use "git add" to track) -
Add the files to the staging area then commit the changes to the local repository using the message Learning about venv and pip.
devasc@labvm:~/labs/devnet-src/parsing$ git add .
devasc@labvm:~/labs/devnet-src/parsing$ git commit -m "Learning about venv and pip"
2.4 Parse Different Data Types with Python🔗
Objectives🔗
Part 1: Parse XML in Python
Part 2: Parse JSON in Python
Part 3: Parse YAML in Python
Instructions🔗
Part 1: Parse XML in Python🔗
Because of the flexibility provided by Extensible Markup Language (XML), it can be tricky to parse. XML’s all-text tagged data fields do not map unambiguously to default data types in Python or other popular languages. In addition, it is not always obvious how attribute values should be represented in data.
These issues can be sidestepped by Cisco developers working in some contexts, because Cisco has provided tools such as YANG-CLI, which validates and consumes XML relevant to data modeling and related tasks. Below is content of the myfile.xml file found in ~/labs/devnet-src/parsing. This is an example of the sort of file that YANG-CLI manages. You will parse this file in Python to get access to the information it contains (in particular, the default-operation and the test-option).
<?xml version="1.0" encoding="UTF-8"?>
<rpc message-id="1"
    xmlns="urn:ietf:params:xml:ns:netconf:base:1.0">
    <edit-config>
    <target>
    <candidate/>
    </target>
    <default-operation>merge</default-operation>
    <test-option>set</test-option>
    <config>
    <int8.1
    xmlns:nc="urn:ietf:params:xml:ns:netconf:base:1.0"
    nc:operation="create"
    xmlns="http://netconfcentral.org/ns/test">9</int8.1>
    </config>
    </edit-config>
</rpc>
Step 1: Build a script to parse the XML data🔗
-
Launch VS Code and open the parsexml.py file found in the ~/labs/devnet-src/parsing directory.
-
Import the
ElementTreemodule of thexmllibrary and the regular expression engine (re). TheElementTreemodule will be used to do the parsing. The regular expression engine (re) will be used to search for specific data.Pythonimport xml.etree.ElementTree as ET import re -
Next, use the
parsefunction fromET(ElementTree) to parse the myfile.xml file and assign it to a variable (xml). Then, get the root element with thegetroot()function and assign it to a variable (root).Pythonxml = ET.parse("myfile.xml") root = xml.getroot() -
Now the top level of the tree can be searched for the containing tag
<edit-config>, and when found, that tagged block can be searched for two named values it contains:<default-operation>and<test-option>. Create a regular expression to get the contents of the XML root content in the<rpc>tag and then add additional regular expressions to drill down into the content in order to find the value of the<edit-config>,<default-operation>, and<test-option>elements.Pythonns = re.match('{.*}', root.tag).group(0) editconf = root.find("{}edit-config".format(ns)) defop = editconf.find("{}default-operation".format(ns)) testop = editconf.find("{}test-option".format(ns)) -
Add
printstatements to print the value of the<default-operation>and<test-option>elements.Pythonprint("The default-operation contains: {}".format(defop.text)) print("The test-option contains: {}".format(testop.text))Important
Make sure you use these exact
printstatements in order for the autograder to correctly mark your work!
Step 2: Run the script🔗
Save and run the parsexml.py. You should get the following output. If not, go back and debug your code.
devasc@labvm:~/labs/devnet-src/parsing$ python3 parsexml.py
The default-operation contains: merge
The test-option contains: set
devasc@labvm:~/labs/devnet-src/parsing$
Step 3: Commit the changes to the repository🔗
-
Add the files to the staging area then commit the changes to the local repository using the message Parsing some XML.
devasc@labvm:~/labs/devnet-src/parsing$ git add parsexml.py
devasc@labvm:~/labs/devnet-src/parsing$ git commit -m "Parsing some XML"
[main 1e37fd2] Parsing some XML
 1 file changed, 13 insertions(+), 1 deletion(-)
devasc@labvm:~/labs/devnet-src/parsing$
Part 2: Parse JSON in Python🔗
Background🔗
Parsing JavaScript Object Notation (JSON) is a frequent requirement of interacting with REST APIs. The steps are usually as follows:
-
Authenticate using a user/password combination to retrieve a token that will expire after a set amount of time. This token is used for authenticating subsequent requests.
-
Execute a GET request to the REST API, authenticating as required, to retrieve the state of a resource, requesting JSON as the output format.
-
Modify the returned JSON, as needed.
-
Execute a POST (or PUT) to the same REST API (again, authenticating as required) to change the state of the resource, again requesting JSON as the output format and interpreting it as needed to determine whether the operation was successful.
The JSON example to parse is this response from a token request:
{
    "access_token":"ZDI3MGEyYzQtNmFlNS00NDNhLWFlNzAtZGVjNjE0MGU1OGZmZWNmZDEwN2ItYTU3",
    "expires_in":1209600,
    "refresh_token":"MDEyMzQ1Njc4OTAxMjM0NTY3ODkwMTIzNDU2Nzg5MDEyMzQ1Njc4OTEyMzQ1Njc4",
    "refreshtokenexpires_in":7776000
}
In Python scripts, the Python json library can be used to parse JSON into Python native data structures and serialize data structures back out as JSON. The Python yaml library can be used to convert the data to YAML.
The following program uses both modules to parse the above JSON data, extract and print data values, and output a YAML version of the file. It uses the json library loads() method to parse a string into which the file has been read. It then uses normal Python data references to extract values from the resulting Python data structure. Finally, it uses the yaml library dump() function to serialize the Python data back out as YAML, to the terminal.
Step 1: Build a script to parse the JSON data🔗
-
Using VS Code, open the parsejson.py file found in the ~/labs/devnet-src/parsing directory.
-
Import the
jsonandyamllibraries.Pythonimport json import yaml -
Use the Python
withstatement to open myfile.json in read-only mode and set it to the variable namejson_file. Then use thejson.loadmethod to load the JSON file into a string set to the variable nameourjson.Pythonwith open('myfile.json','r') as json_file: ourjson = json.load(json_file)Note
There is no need to explicitly close the file as the
withstatement ensures proper opening and closing of the file. -
Add a
printstatement forourjsonto see that it is now a Python dictionary.Pythonprint(ourjson)
Step 2: Run the script to print the JSON data and then modify it to print data of interest🔗
-
Save and run your script. You should see the following output.
devasc@labvm:~/labs/devnet-src/parsing$ python3 parsejson.py {'access_token': 'ZDI3MGEyYzQtNmFlNS00NDNhLWFlNzAtZGVjNjE0MGU1OGZmZWNmZDEwN2ItYTU3', 'expires_in': 1209600, 'refresh_token': 'MDEyMzQ1Njc4OTAxMjM0NTY3ODkwMTIzNDU2Nzg5MDEyMzQ1Njc4OTEyMzQ1Njc4', 'refreshtokenexpires_in': 7776000} devasc@labvm:~/labs/devnet-src/parsing$ -
Add
printstatements to the end of your code that displays the token value and how many seconds until the token expires.Pythonprint("The access token is: {}".format(ourjson['access_token'])) print("The token expires in {} seconds.".format(ourjson['expires_in']))Important
Make sure you use these exact
printstatements in order for the autograder to correctly mark your work! -
Save and run your script. You should see the following output.
devasc@labvm:~/labs/devnet-src/parsing$ python3 parsejson.py
{'access_token': 'ZDI3MGEyYzQtNmFlNS00NDNhLWFlNzAtZGVjNjE0MGU1OGZmZWNmZDEwN2ItYTU3', 'expires_in': 1209600, 'refresh_token': 'MDEyMzQ1Njc4OTAxMjM0NTY3ODkwMTIzNDU2Nzg5MDEyMzQ1Njc4OTEyMzQ1Njc4', 'refreshtokenexpires_in': 7776000}
1209600
The access token is ZDI3MGEyYzQtNmFlNS00NDNhLWFlNzAtZGVjNjE0MGU1OGZmZWNmZDEwN2ItYTU3
The token expires in 1209600 seconds
devasc@labvm:~/labs/devnet-src/parsing$
Step 3: Output the parsed JSON data in a YAML data format🔗
-
Without removing any existing code, add a
printstatement that will display the three dashes required for a YAML file. The two\nwill add two lines after the previous output. Then add a statement to printourjsonas YAML data by using thedump()method of theyamllibrary.Pythonprint("\n\n---") print(yaml.dump(ourjson))Important
Make sure you use these exact
printstatements in order for the autograder to correctly mark your work! -
Save and run your script. You should see the following output.
devasc@labvm:~/labs/devnet-src/parsing$ python3 parsejson.py
<output from previous steps omitted>
---
access_token: ZDI3MGEyYzQtNmFlNS00NDNhLWFlNzAtZGVjNjE0MGU1OGZmZWNmZDEwN2ItYTU3
expires_in: 1209600
refresh_token: MDEyMzQ1Njc4OTAxMjM0NTY3ODkwMTIzNDU2Nzg5MDEyMzQ1Njc4OTEyMzQ1Njc4
refreshtokenexpires_in: 7776000

devasc@labvm:~/labs/devnet-src/parsing$
Step 4: Commit the changes to the repository🔗
-
Add the files to the staging area then commit the changes to the local repository using the message Parsing some JSON.
devasc@labvm:~/labs/devnet-src/parsing$ git add parsejson.py
devasc@labvm:~/labs/devnet-src/parsing$ git commit -m "Parsing some JSON"
[main 11f8b3d] Parsing some JSON
 1 file changed, 11 insertions(+), 1 deletion(-)
devasc@labvm:~/labs/devnet-src/parsing$
Part 3: Parse YAML in Python🔗
The following program imports the json and yaml libraries, uses PyYAML to parse a YAML file, extract and print data values, and output a JSON version of the file. It uses the yaml library safe_load() method to parse the file stream and normal Python data references to extract values from the resulting Python data structure. It then uses the json library dumps() function to serialize the Python data back out as JSON.
The YAML example to parse is the same YAML file you outputted in Part 3:
---
access_token: ZDI3MGEyYzQtNmFlNS00NDNhLWFlNzAtZGVjNjE0MGU1OGZmZWNmZDEwN2ItYTU3
expires_in: 1209600
refresh_token: MDEyMzQ1Njc4OTAxMjM0NTY3ODkwMTIzNDU2Nzg5MDEyMzQ1Njc4OTEyMzQ1Njc4
refreshtokenexpires_in: 7776000
Step 1: Build a script to parse the YAML data🔗
-
In VS Code, open the parseyaml.py file found in the ~/labs/devnet-src/parsing directory.
-
Import the
jsonandyamllibraries.Pythonimport json import yaml -
Use the Python
withstatement to open myfile.yaml as read-only and set it to the variable nameyaml_file. Then use theyaml.safe_load()method to load the YAML file into a string set to the variable nameouryaml.Pythonwith open('myfile.yaml','r') as yaml_file: ouryaml = yaml.safe_load(yaml_file) -
Add a
printstatement forouryamlto see that it is now a Python dictionary.Pythonprint(ouryaml)
Step 2: Run the script to print the YAML data and then modify it to print data of interest🔗
-
Save and run your script. You should see the following output.
devasc@labvm:~/labs/devnet-src/parsing$ python3 parseyaml.py {'access_token': 'ZDI3MGEyYzQtNmFlNS00NDNhLWFlNzAtZGVjNjE0MGU1OGZmZWNmZDEwN2ItYTU3', 'expires_in': 1209600, 'refresh_token': 'MDEyMzQ1Njc4OTAxMjM0NTY3ODkwMTIzNDU2Nzg5MDEyMzQ1Njc4OTEyMzQ1Njc4', 'refreshtokenexpires_in': 7776000} devasc@labvm:~/labs/devnet-src/parsing$ -
Add
printstatements to the end of your code that display the token value and how many seconds until the token expires.Pythonprint("The access token is {}".format(ouryaml['access_token'])) print("The token expires in {} seconds.".format(ouryaml['expires_in']))Important
Make sure you use these exact
printstatements in order for the autograder to correctly mark your work! -
Save and run your script. You should see the following output.
devasc@labvm:~/labs/devnet-src/parsing$ python3 parseyaml.py
{'access_token': 'ZDI3MGEyYzQtNmFlNS00NDNhLWFlNzAtZGVjNjE0MGU1OGZmZWNmZDEwN2ItYTU3', 'expires_in': 1209600, 'refresh_token': 'MDEyMzQ1Njc4OTAxMjM0NTY3ODkwMTIzNDU2Nzg5MDEyMzQ1Njc4OTEyMzQ1Njc4', 'refreshtokenexpires_in': 7776000}
The access token is ZDI3MGEyYzQtNmFlNS00NDNhLWFlNzAtZGVjNjE0MGU1OGZmZWNmZDEwN2ItYTU3
The token expires in 1209600 seconds.
devasc@labvm:~/labs/devnet-src/parsing$
Step 3: Output the parsed YAML data in a JSON data format🔗
-
Add a
printstatement to add two blank lines after the previous output. Then add a statement to printouryamlas JSON data by using thedumps()method of the json library. Add theindentparameter to prettify the JSON data.Pythonprint("\n\n") print(json.dumps(ouryaml, indent=4))Important
Make sure you use these exact
printstatements in order for the autograder to correctly mark your work! -
Save and run your script. You should see the following output. Notice that the output looks just like the myfile.json.
devasc@labvm:~/labs/devnet-src/parsing$ python3 parseyaml.py
<output from previous steps omitted>
{
  "access_token": "ZDI3MGEyYzQtNmFlNS00NDNhLWFlNzAtZGVjNjE0MGU1OGZmZWNmZDEwN2ItYTU3",
  "expires_in": 1209600,
  "refresh_token": "MDEyMzQ1Njc4OTAxMjM0NTY3ODkwMTIzNDU2Nzg5MDEyMzQ1Njc4OTEyMzQ1Njc4",
  "refreshtokenexpires_in": 7776000
}
devasc@labvm:~/labs/devnet-src/parsing$
Step 4: Commit the changes to the repository🔗
-
Add the files to the staging area then commit the changes to the local repository using the message Parsing some YAML.
devasc@labvm:~/labs/devnet-src/parsing$ git add parseyaml.py
devasc@labvm:~/labs/devnet-src/parsing$ git commit -m "Parsing some YAML"
[main 12fcd00] Parsing some YAML
 1 file changed, 11 insertions(+), 1 deletion(-)
devasc@labvm:~/labs/devnet-src/parsing$
Part 4: Update the README file and push to remote🔗
Once you have finished the entire lab, edit the README file, do a final commit, and push all your commits to the remote repository for grading.
Step 1: Edit README.md🔗
-
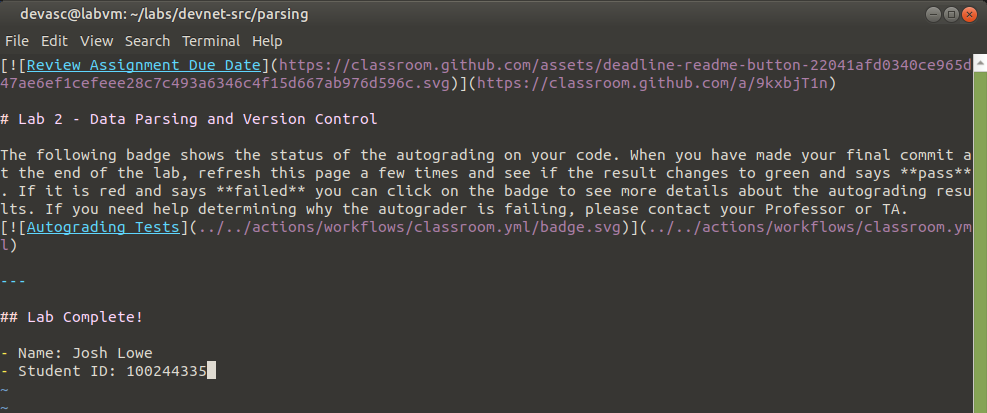
Open the README.md file in
vi(the filename is case-sensitive).devasc@labvm:~/labs/devnet-src/parsing$ vi README.mdNote
The README.md file is written using a formatting language called Markdown. You can find more details, and a syntax guide, at https://www.markdownguide.org/. vi is a text-based editor included in most Linux distributions. It uses keyboard shortcuts for navigating and editing documents. You can find many references on the internet, but here is one from RedHat Linux: https://www.redhat.com/sysadmin/introduction-vi-editor.
-
Use the arrow keys to move the cursor to the end of the file (on top of the three dashes) and press O (lower-case letter "o") to create a new line and automatically switch to insert mode.
-
Press Enter to create a blank line, then create a level 2 heading (starting with two
#charaters) with the text Lab Complete! pressing Enter twice afterwards to add another blank line.<blank line> ## Lab Complete! <blank line> -
Create an unordered list with the following text (replace Your-Name and Your-10xxxxxxx-ID values as appropriate):
- Name: Your-Name
- Student ID: Your-100xxxxxx-ID
Your file should look similar to this:
-
Press Esc to return to command mode, then use the command
:wqto save the file and exit Vi.
Step 2: Commit the changes to the repository🔗
-
Add the README.md file to the staging area then commit the changes to the local repository using the message Lab Complete.
devasc@labvm:~/labs/devnet-src/parsing$ git add README.md
devasc@labvm:~/labs/devnet-src/parsing$ git commit -m "Lab Complete"
[main 591f3aa] Lab Complete
 1 file changed, 5 insertions(+)
devasc@labvm:~/labs/devnet-src/parsing$
Step 3: Push all changes to the remote repository on GitHub🔗
-
Push your changes using the
git pushcommand, specifying the remote repository with the aliasoriginand the branch calledmain.devasc@labvm:~/labs/devnet-src/parsing$ git push origin main -
When prompted for your username, use the e-mail address associated with your GitHub account. For the password, use the Personal Access Token you created near the beginning of the lab.
Username for 'https://github.com': username Password for 'https://username@github.com': Personal Access Token Enumerating objects: 1121, done. Counting objects: 100% (1121/1121), done. Delta compression using up to 2 threads Compressing objects: 100% (1101/1101), done. Writing objects: 100% (1119/1119), 4.08 MiB | 1.28 MiB/s, done. Total 1119 (delta 371), reused 0 (delta 0), pack-reused 0 (from 0) remote: Resolving deltas: 100% (371/371), completed with 1 local object. To https://github.com/Ontario-Tech-NITS/lab-2-data-parsing-and-version-control-w2025-<username>.git ffd8eec..4692020 main -> main -
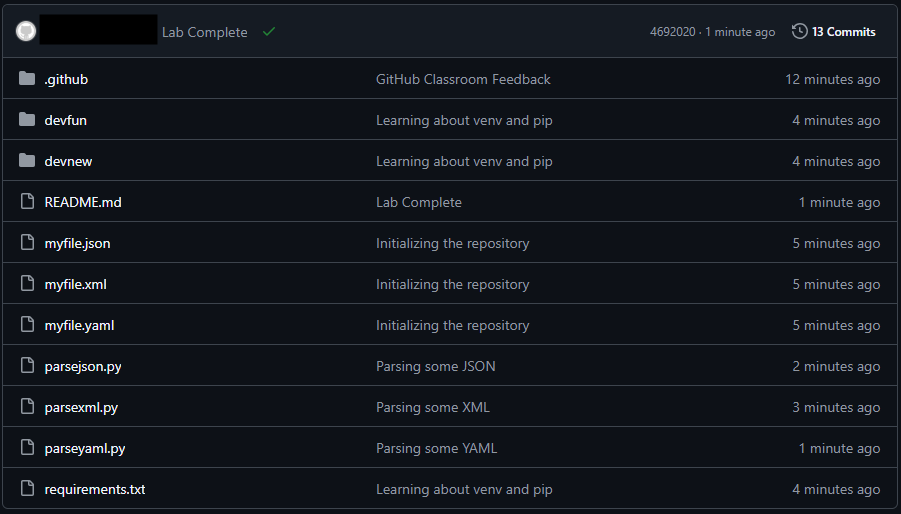
In your browser, return to the repository on github.com and verify all your changes are present, along with the corresponding commit messages.
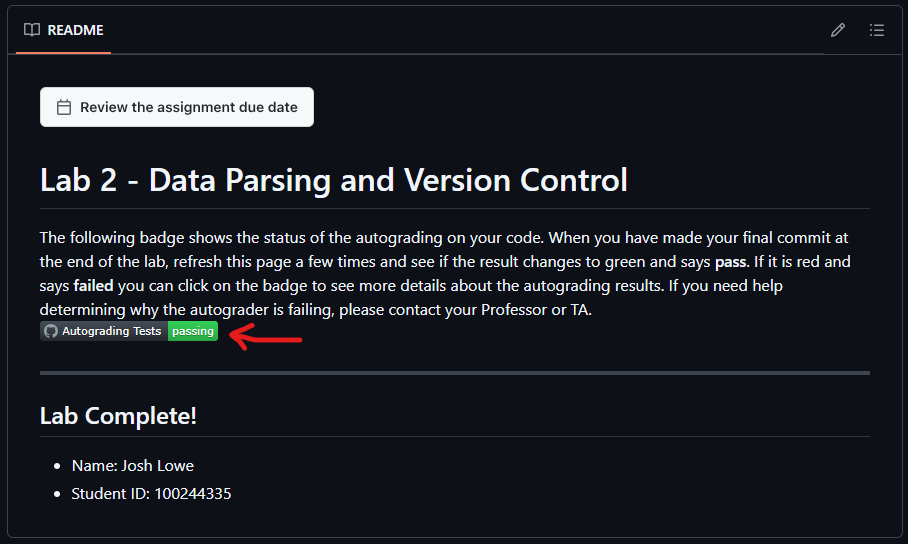
-
Verify that your name and student ID appears in the README at the bottom of the window, and that the Autograding Tests are passing. If the tests are failing, click on the failing badge to go to the autograder workflow and see which tests are failing. Correct your code, recommit to your local repository, and push to GitHub again to retrigger the autograder. Continue correcting your code until the Autograding Tests are passing.